


Football/Soccer Session (Beginner): Defending the goal from wide areas
Profile Summary

| Name: | Ash Snadd |
|---|---|
| City: | london |
| Country: | United Kingdom |
| Membership: | Adult Member |
| Sport: | Football/Soccer |
See the guidance at the top of this page to understand why you are not seeing interactive Football/Soccer images.
Learning Objectives

|
Technical Use of Clearing techniques such as Heading, Volleying and Passing. |

|
Tactical Use of Zonal Marking from crosses from Wide Areas. |

|
Physical How to use your body when challenging for the ball for a header to block a cross. |

|
Psychological When to press the ball, when to drop into position and to take leadership of the Defensive Unit. |

|
Social Communication between players when passing players on between Zones. |
See the guidance at the top of this page to understand why you are not seeing interactive Football/Soccer images.
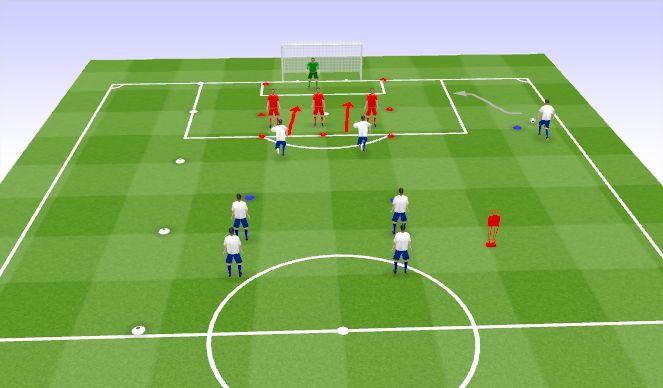
Waves!- Scenario 2
Waves- Defend the cut back
-Attacking team feeds ball to wide player who then crosses the ball into the danger zone (marked out by red cones)
-Attackers need to try and score in the danger zone
-Defender's clear out of 18 yard box to win a point
KCP
1- Recovery- Recovery run is a sprint, once our defensive line is broken sprint back in to get goal side, get back in then mark
2- Compactness & man marking - (2, 5, 6) Nearest CB is in the front post blocking zone, to block cross in behind defensive line. Other CB and FB get tighter to players (goal side) and anticipate to intercept or get out to ball and block shot
4- Awareness of attacker- As you're travelling constantly scanning so you have awareness of the attacker and a better position to win first contact
5- Height, Width, Distance- When clear ball use pace on ball to get good contact and get height, width and distance on clearance. Avoid clearing up centre of pitch.
6- Squeeze up once ball is cleared, do not want to allow too much space in front.
Nearest CB to the ball, recovers and takes up a position near the Front Post blocking zone.Other CB positions get tighter to player in the box, Fb gets tight to other player in box
CDM drops into the Edge of the 18 yard area to pick up late runners or any loose balls.
Progressions
-Add a third attacker
-Add a CDM (4)- Cover cutback zone
-Add mini goal for keeper to aim for when after claiming ball
See the guidance at the top of this page to understand why you are not seeing interactive Football/Soccer images.
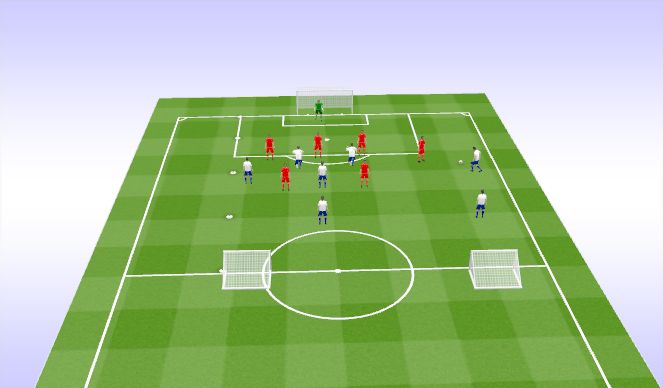
Function
Function 4-2 vs 2-3-2
-Attackers encouraged to get the ball into box and try and score from 1 touch finish in box
-Objective for defenders is to defend crosses, and look to score in small goals if they win possession- score within 5 seconds. If the ball is cleared away or possession is won by the defensive team they have 7 seconds to try to get the ball into the goals placed on the half-way line. Any of the players can attempt the pass the ball into the goals. (These goals are there so that the defending team have a chance to play out if they win the ball but also, Wide Midfielders should be there during a real game).
What
-Remember POP- Compactness-deny space centrally and deny space in the box- do not go pressing ball on own as it will create space for opposition to attack- trust in ability to defend crosses- Midfielders screen strikers to begin with and force ball out wide
1- Compactness- (5, 6, 2) Be compact in a straight line to cover the width of the danger zone and maximise our chances of getting first contact on crosses. If ball is in your zone attack it whilst other 2 players cover
2- Marking a player in your zone- (5, 6, 2) As ball is about to be delivered if a player is in your zone get goal-side, ball-side to ensure the player can't get into the space between defence and goalkeeper (1) Goalkeeper in a position to come and claim the ball if it's in 6 yard box
3- Awareness of attacker- (5, 6, 2) Open body position & constantly scanning so you have awareness of the attacker and a better position to win first contact
4- Communicate- (5, 6, 2) Communicate who you're picking up and if a player is moving into another zone (1) Command the 6 yard box
5- Height, Width, Distance- When clear ball use pace on ball to get good contact and get height, width and distance on clearance. Avoid clearing up centre of pitch.
6- Squeeze up once ball is cleared, do not want to allow too much space in front
7- 4 & 8- recovery run is a sprint- cover cutback area- form a diamond- get goal side of player marking
8- 2 & 3 - Show attackers outside, block any crosses. When ball is crossed off opposite wing aim to be positioned on back post zone
GK
Progressions
-Add a third attacker
-Add a CDM (4)- Cover cutback zone
-Add mini goal for keeper to aim for when after claiming ball
See the guidance at the top of this page to understand why you are not seeing interactive Football/Soccer images.
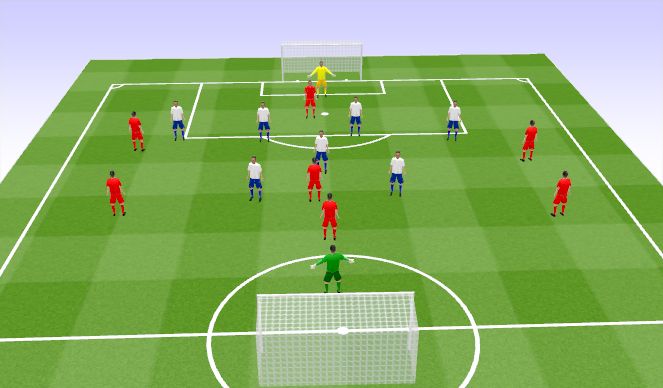
SSG
SSG - 9v9. Formations - Blues/Reds 4-2-1 vs 3-3-1
Objectives & Conditions.
BLUES;
- not to concede a goal
- 10 seconds to score a goal when in possession.
- Try not to get done on the inside and avoid being split by passes.
REDS;
- Try to score by breaking down defensive unit.
- Try too avoid shooting from range if possible but can if you need or want too.
- Play High and Wide and on the shoulders of Blue defenders.
Individual Player Roles;
Blues;
- 1/GK - Organise and Command Defence, Tell them where they should be and if they need to check shoulder to scan for players. Have a good starting position.
2 & 3 - Show attackers outside, block any crosses. When ball is crossed off opposite wing aim to be positioned on back post zone
5 & 6 - aim to stay roughly 10 yards apart or less. when one player commits to a tackle other should drop off and recover into position for second ball or to clear up if any loose balls of unsuccessful tackle. If ball is crossed into the box 1 CB aim to be front post & other CB try to be inline with penalty spot to clear.
4 - protect CB's, screen passes, only commit to tackles if positive about winning ball back. Cover run between CB when beat or ball is wide, Protect edge of area when crosses being played, aim to be between the penalty spot and edge of 18 yard area to pick up any cut backs.
8 & 10 - Help 4 protect and screen passes, show attackers outside, look to play 9 through when in possession.
9 - try to score, help track back when opposition defence dribble out.
ALL BLUE PLAYERS MUST TRY TO MAINTAIN POSITIONAL DISCIPLINE AND NOT CHACE DOWN BALLS FOR NO REASON.
RED TEAM;
- 7 & 11 Play high and wide, look to cross the ball early into dangerous areas & get in box when ball is on other side
-9- look to get behind and play on the inside shoulder if possible or drop and link up with other but look to spin and get in behind, stay active and try to move blue defensive unit around and out of positions
-2 & 3- Provide an option beneath ball for deep cross & overlap winger to create crossing opportunity
-8- Look to make late runs into the box
6- Look to switch play at every opportunity
'%3E%3Cpath id='path4169' d='M 11.4375,70.25 C 11.457031,38.394531 37.277344,13.242188 68.253906,13.050781 99.78125,12.855469 125.73047,38.351563 125.8125,70.078125 125.89844,101.62109 100.43359,127.14063 69.148438,127.42188 37.582031,127.70703 11.464844,102.23438 11.4375,70.25 m 6.425781,-0.08984 c 0.03516,28.421871 23.027344,50.69922 50.519532,50.82031 C 96.433594,121.10156 119.30469,98.367188 119.38281,70.359375 119.45313,42.878906 97.382813,19.714844 69.015625,19.496094 40.75,19.277344 17.964844,42.035156 17.863281,70.160156' style='clip-rule:nonzero;fill:%23333f48;fill-opacity:1;fill-rule:nonzero;stroke:none' /%3E%3Cpath style='fill:%23333f48;fill-opacity:1;fill-rule:nonzero;stroke:none' d='m 39.789063,108.62109 c 0.28125,0.14454 0.550781,0.32032 0.839843,0.4336 2.734375,1.05469 5.554688,1.78125 8.453125,2.23047 2.734375,0.42578 5.484375,0.64453 8.25,0.54297 3.988282,-0.15625 7.832032,-0.94922 11.445313,-2.69532 1.683594,-0.8164 3.246094,-1.82422 4.640625,-3.07422 3.265625,-2.92578 5.171875,-6.582027 5.796875,-10.906246 0.546875,-3.761719 0.04687,-7.425781 -1.09375,-11.019531 -1.4375,-4.523438 -3.730469,-8.582032 -6.703125,-12.265625 -1.03125,-1.277344 -2.082031,-2.535157 -3.113281,-3.808594 C 66.789063,66.1875 65.332031,64.269531 64.0625,62.21875 c -1.601562,-2.582031 -2.835937,-5.316406 -3.613281,-8.261719 -0.683594,-2.574218 -0.902344,-5.1875 -0.6875,-7.828125 0.214844,-2.617187 0.910156,-5.117187 2.152344,-7.441406 2.164062,-4.050781 5.503906,-6.710937 9.816406,-8.179687 1.890625,-0.640625 3.835937,-1.058594 5.832031,-1.195313 1.121094,-0.07813 2.242188,-0.152344 3.363281,-0.164062 4.28125,-0.02734 8.4375,0.734375 12.453125,2.175781 1.871094,0.671875 3.6875,1.496094 5.523438,2.257812 0.226562,0.09375 0.4375,0.230469 0.664062,0.351563 -0.164062,0.25 -0.371093,0.160156 -0.539062,0.164062 -2.824219,0.101563 -5.535156,0.703125 -8.132813,1.804688 -1.335937,0.570312 -2.570312,1.316406 -3.648437,2.296875 -2.527344,2.296875 -3.605469,5.15625 -3.34375,8.550781 0.140625,1.855469 0.722656,3.574219 1.550781,5.222656 0.648438,1.296875 1.414063,2.523438 2.292969,3.675782 0.953125,1.25 1.929687,2.484375 2.929687,3.699218 2.085938,2.523438 4.164063,5.054688 6.050782,7.738282 2.203125,3.136718 4.140627,6.417968 5.589847,9.980468 1.16406,2.867188 2.01562,5.820313 2.39843,8.894532 0.25,2.011718 0.30079,4.03125 0.11719,6.058593 -0.24219,2.640625 -0.79297,5.195313 -1.74609,7.667969 -1.29688,3.36328 -3.300784,6.22656 -5.972659,8.63281 -2.429687,2.19141 -5.171875,3.90625 -8.109375,5.3125 -2.695312,1.29297 -5.464843,2.40235 -8.34375,3.20313 -1.953125,0.54687 -3.945312,0.8789 -5.949218,1.15625 -3.035157,0.41797 -6.085938,0.48828 -9.132813,0.3125 -5.328125,-0.3125 -10.476562,-1.46094 -15.410156,-3.52344 -3.449219,-1.44141 -6.691406,-3.25781 -9.757813,-5.39453 -0.183593,-0.12891 -0.378906,-0.25 -0.53125,-0.41016 -0.07031,-0.0703 -0.05859,-0.22656 -0.08203,-0.34375 z m 0,0' id='path4175' /%3E%3Cpath style='fill:%23333f48;fill-opacity:1;fill-rule:nonzero;stroke:none' d='M 94.699219,29.390625 C 94.089844,29.21875 93.476563,29.054688 92.867188,28.875 90.183594,28.085938 87.46875,27.441406 84.703125,27.046875 c -3.976562,-0.566406 -7.945312,-0.59375 -11.863281,0.402344 -7.535156,1.914062 -12.386719,6.71875 -14.878906,13.996094 -0.894532,2.617187 -1.179688,5.328125 -0.953125,8.078125 0.203125,2.484375 0.867187,4.859375 1.816406,7.160156 0.933594,2.261719 2.117187,4.390625 3.4375,6.449219 1.4375,2.25 3.050781,4.371093 4.640625,6.511718 1.4375,1.933594 2.867187,3.871094 4.261719,5.835938 1.230468,1.730469 2.316406,3.546875 3.273437,5.445312 1.324219,2.625 2.265625,5.378907 2.703125,8.292969 0.433594,2.902344 0.292969,5.765625 -0.660156,8.5625 -0.9375,2.74609 -2.574219,5.00781 -4.777344,6.875 -2.417969,2.04688 -5.203125,3.39844 -8.246094,4.22266 -1.835937,0.5 -3.703125,0.75781 -5.609375,0.82031 -3.886718,0.13281 -7.679687,-0.47266 -11.421875,-1.46094 -2.261718,-0.59765 -4.488281,-1.33203 -6.695312,-2.11328 -0.207031,-0.0742 -0.40625,-0.16797 -0.597656,-0.25 -0.02344,-0.24609 0.148437,-0.19141 0.25,-0.20703 1.96875,-0.30469 3.921875,-0.67969 5.804687,-1.34766 1.367188,-0.48437 2.671875,-1.10156 3.855469,-1.94922 2.25,-1.61328 3.65625,-3.765621 4.0625,-6.515621 0.273437,-1.867188 0.09375,-3.710938 -0.429688,-5.527344 -0.472656,-1.648437 -1.171875,-3.199219 -2.109375,-4.628906 -0.792968,-1.207031 -1.636718,-2.382813 -2.523437,-3.519531 -0.921875,-1.195313 -1.921875,-2.328125 -2.890625,-3.484375 -2.753906,-3.273438 -5.351563,-6.660157 -7.523438,-10.355469 -2.042968,-3.480469 -3.667968,-7.136719 -4.597656,-11.078125 -0.640625,-2.699219 -0.980469,-5.4375 -0.832031,-8.214844 0.238281,-4.53125 1.476562,-8.78125 3.824219,-12.6875 1.082031,-1.800781 2.445312,-3.375 3.988281,-4.800781 2.742187,-2.527344 5.863281,-4.480469 9.257812,-5.992188 3.746094,-1.667968 7.652344,-2.769531 11.707032,-3.394531 3.152343,-0.488281 6.324218,-0.671875 9.507812,-0.519531 8.632813,0.410156 16.671875,2.792969 24,7.433594 0.08203,0.05078 0.152344,0.109375 0.230469,0.167968 -0.0039,0.04297 -0.0078,0.08984 -0.01563,0.136719' id='path4177' /%3E%3Cpath style='fill:%23333f48;fill-opacity:1;fill-rule:nonzero;stroke:none' d='m 31.699219,38.75 c -0.07813,0.238281 -0.152344,0.476563 -0.238281,0.710938 -1.460938,4.074218 -2.066407,8.28125 -1.808594,12.59375 0.4375,7.304687 2.808594,13.925781 7.277344,19.753906 3.714843,4.84375 7.441406,9.671875 11.167968,14.503906 1.113282,1.441406 1.953125,3.007813 2.414063,4.777344 0.332031,1.257812 0.425781,2.539062 0.273437,3.820312 -0.214843,1.832032 -1.070312,3.34375 -2.464843,4.546875 -0.984375,0.851559 -2.113282,1.449219 -3.316407,1.925779 -1.378906,0.54297 -2.8125,0.89063 -4.273437,1.1211 -2.226563,0.35547 -4.46875,0.46093 -6.722656,0.41015 -0.589844,-0.0156 -1.046875,-0.18359 -1.433594,-0.625 -0.636719,-0.72265 -1.335938,-1.39062 -1.9375,-2.14062 C 25.574219,93.800781 22.300781,86.621094 20.84375,78.636719 20.152344,74.835938 19.917969,71 20.15625,67.128906 20.796875,56.773438 24.390625,47.574219 30.859375,39.480469 c 0.21875,-0.273438 0.453125,-0.53125 0.679688,-0.796875 0.05469,0.02344 0.109375,0.04297 0.160156,0.06641' id='path4179' /%3E%3Cpath style='fill:%23333f48;fill-opacity:1;fill-rule:nonzero;stroke:none' d='m 105.41016,101.30078 c -0.13282,-0.3125 0.0234,-0.5039 0.0977,-0.69922 1.38672,-3.749997 1.98047,-7.628904 1.89844,-11.621091 -0.14453,-6.84375 -2.08594,-13.144531 -5.73437,-18.925781 C 99.890625,67.226563 97.917969,64.53125 95.835938,61.917969 94.4375,60.160156 92.988281,58.4375 91.582031,56.6875 90.632813,55.511719 89.6875,54.335938 88.792969,53.121094 c -0.835938,-1.144531 -1.488281,-2.398438 -1.953125,-3.742188 -0.523438,-1.515625 -0.695313,-3.070312 -0.511719,-4.652343 0.21875,-1.839844 1.082031,-3.339844 2.476563,-4.542969 1.039062,-0.890625 2.230468,-1.507813 3.503906,-1.980469 1.632812,-0.609375 3.320312,-0.960937 5.046875,-1.175781 1.917969,-0.238281 3.839841,-0.269531 5.769531,-0.230469 0.52734,0.01172 0.89453,0.203125 1.23828,0.585938 5.50391,6.113281 9.26172,13.144531 11.21875,21.132812 1.11719,4.554688 1.5625,9.179688 1.30469,13.855469 -0.58203,10.625 -4.23438,20.082031 -10.96094,28.339846 -0.15625,0.1914 -0.32812,0.375 -0.51562,0.58984' id='path4181' /%3E%3Cpath style='fill:%23333f48;fill-opacity:1;fill-rule:nonzero;stroke:none' d='m 39.796875,108.63281 c -0.05859,0.0117 -0.117187,0.0234 -0.175781,0.0352 0.05469,-0.0156 0.113281,-0.0312 0.167969,-0.0469 z m 0,0' id='path4183' /%3E%3C/g%3E%3C/svg%3E)

 Play animation
 Play step-by-step
 Repeat (toggle)
 Full Screen
 Pause
Pause Stop
Stop
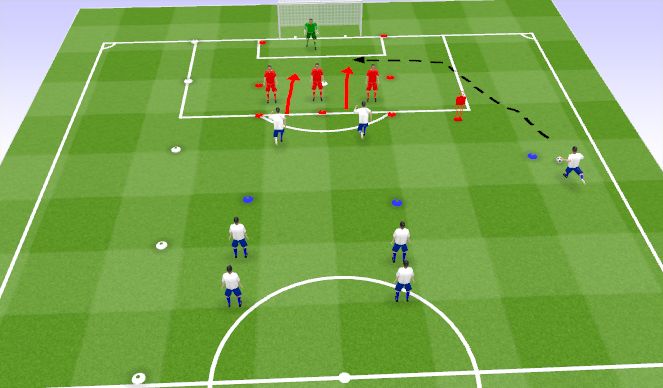
Waves- Scenario 1
Waves- Defend the cross
Working with the Defensive Unit (GK,CB,CB,RB, LB, CDM).
The priority here is to defend the goal specifically the space between the penalty spot and 6 yard box (danger zone) which is 80% of goals are scored in football. The objective is to learn to win first contact and clear with distance, height and width whilst denying the opposition the space in behind in front of our back 4 which increases the likelihood of them scoring
-Attacking team feeds ball to wide player who then crosses the ball into the danger zone (marked out by red cones)
-Attackers need to try and score in the danger zone
-Defender's clear out of 18 yard box to win a point
KCP
1- Compactness- (5, 6, 2) Be compact in a straight line to cover the width of the danger zone and maximise our chances of getting first contact on crosses. If ball is in your zone attack it whilst other 2 players cover- Remember priority is to deny them space behind our defensive line
Height of line depends on ball, attacking player, wide player and position on pitch, goalkeeper confidence
2- Marking a player in your zone- (5, 6, 2) As ball is about to be delivered if a player is in your zone get goal-side, ball-side to ensure the player can't get into the space between defence and goalkeeper (1) Goalkeeper in a position to come and claim the ball if it's in 6 yard box
3- Awareness of attacker- (5, 6, 2) Open body position & constantly scanning so you have awareness of the attacker and a better position to win first contact
4- Communicate- (5, 6, 2) Communicate who you're picking up and if a player is moving into another zone (1) Command the 6 yard box
5- Height, Width, Distance- When clear ball use pace on ball to get good contact and get height, width and distance on clearance. Avoid clearing up centre of pitch.
6- Squeeze up once ball is cleared, do not want to allow too much space in front.
CB positions themselves in the Centre of the 18yard area (Between 6 yard and Penalty spot, Opposite Full-Back covers around and takes up the Back-Post area
CDM drops into the Edge of the 18 yard area to pick up late runners or any loose balls. GK
Progressions
-Add a third attacker
-Add a CDM (4)- Cover cutback zone
-Add mini goal for keeper to aim for when after claiming ball