


Football/Soccer Session (Academy Sessions): What side to defend?

Premier Users' Club
Christopher Hole
Profile Summary

| Name: | Christopher Hole |
|---|---|
| City: | swansea |
| Country: | United Kingdom |
| Membership: | Adult Member |
| Sport: | Football/Soccer |
Description
Dynamic Warm up - 10 minutes
Function - 20 minutes
SSG - 25 minutes
Cool down - 5 minutes
See the guidance at the top of this page to understand why you are not seeing interactive Football/Soccer images.
See the guidance at the top of this page to understand why you are not seeing interactive Football/Soccer images.
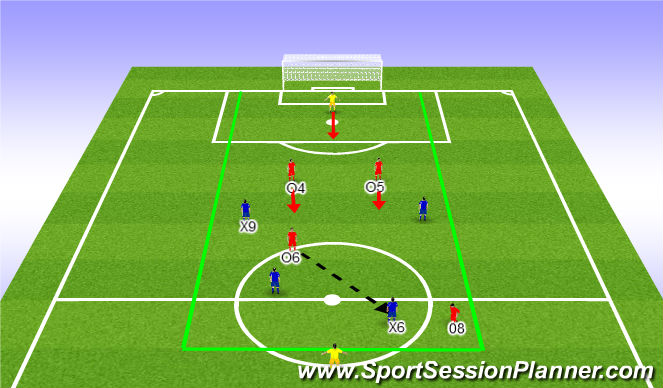
Scenario 1
Set up No1 – Covering Space in behind – The Red Zone
Defending Os GK- 2 – 2 – T
Attacking Xs T – 2 - 2
Organisation
The target player (T) can be used for both teams to recycle the ball and keep the game flowing, the defending team can score by passing to the target player.
Area coned off to work on central areas.
Set up in middle AND DEFENDING third but in central areas
Coaching position where you can coach the defensive unit
Use offside for realism
The Start Point No1
O6 try's to pass to O8 but X6 intercepts.
X6 immediately try's to pass in behind advancing defenders
Or a variation on this start
See the guidance at the top of this page to understand why you are not seeing interactive Football/Soccer images.
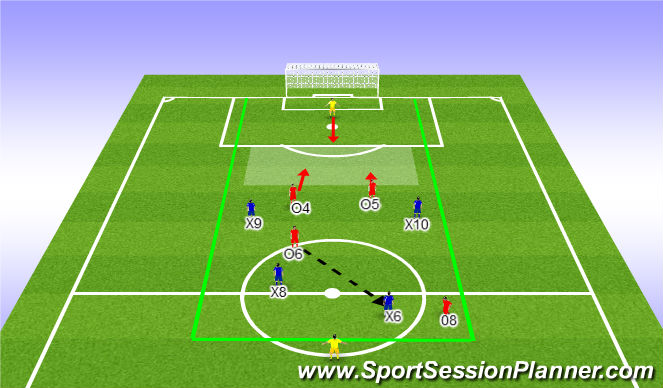
Scenario 2
Ball over the top to Exploit Space in the Red Zone
X6 executes pass over the top of O4 as quickly as possible away from the GK into space as All X’s push for attack
Key Coaching Aspects
There is NO pressure on the ball so defenders will have to drop and narrow.
Defenders Cover INSIDE SHOULDERS of attackers in this picture
Primary Players
O4 & O5 push until game transition then on execution of the pass from X6
O4 & O5 RE ASSESS and drop and narrow towards goal O4 attempts to head clear, or tackle/pass out of defence or back to the GK
Timing/teamwork for offside runs
Good communication between O4 & O5 and the GK.
Secondary Players
Can the GK come for the ball?
O6 recover to support
O8 pressure the pass
See the guidance at the top of this page to understand why you are not seeing interactive Football/Soccer images.
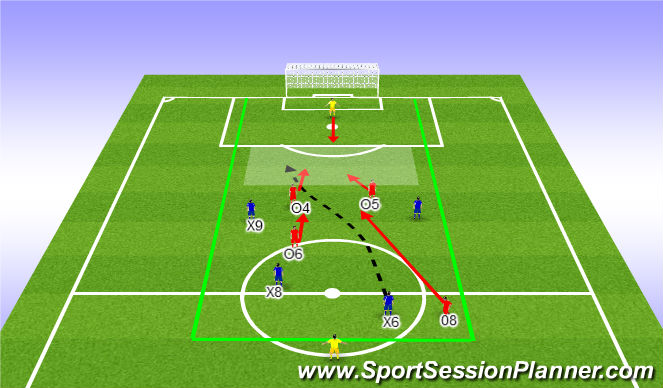
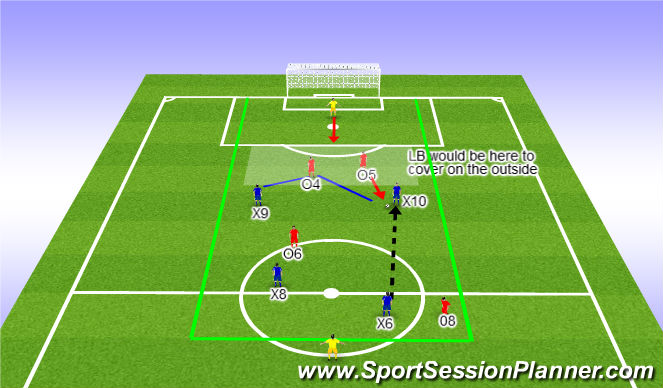
Scenario 3
Key Coaching Aspects
There is NO pressure on the ball so defenders will have to drop and narrow.
Defenders Cover INSIDE SHOULDERS of attackers in this picture
Primary Player
As 04 goes to attack the ball 05 is in a INSIDE SHOULDER AND CAN
Track the possible run of X10 and still see the ball this is called a Defensive Triangle which means See the Man See the Ball (shown in blue lines)
Cover the are in the red zone behind him
Provide cover and balance for 04.
Technical Detail
Very quick running backwards and laterally
Body shape open to see the defensive triangle
On the front foot
In a position to check that he can support 04
See the guidance at the top of this page to understand why you are not seeing interactive Football/Soccer images.
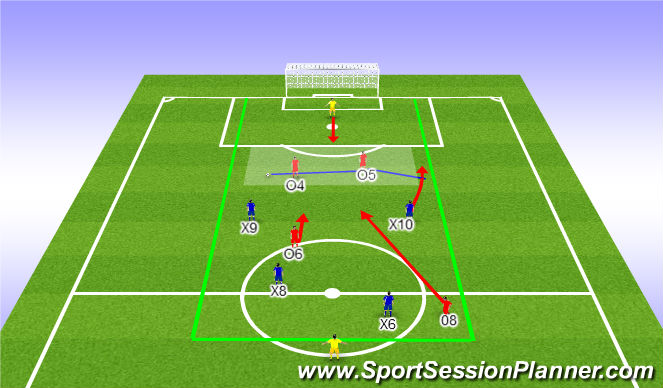
Scenario 4
Problem No2 = Ball Into Strikers Feet
X6 executes pass to the feet of X10
All X’s push for attack
Key Coaching Aspects
05 will have to mark X10 tight to stop him turning or exploiting space in the Red Zone
Primary Players
O5 quickly moves on the execution of the pas and marks the INSIDE SHOULDER of X10
Key Technical Detail
O5 on the front foot
Decision if he can intercept on the inside shoulder of X10
NOT GET TURNED by X10
Secondary Players
O4 covers X9 with a defensive triangle on the inside of X9
Provides cover and balance for O5
The left back would be covering in a real situation
See the guidance at the top of this page to understand why you are not seeing interactive Football/Soccer images.
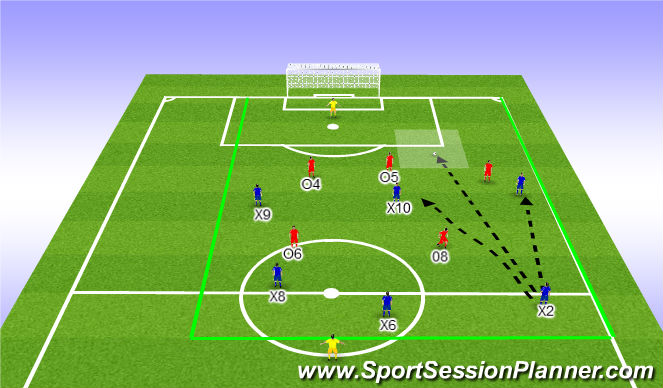
Scenario 5
Problem No3 = Channel Run From X10
X2 looks to pass in behind O3 or into feet of X10
Key Coaching Aspects
05 will have to mark X10 on the OUTSIDE SHOULDER so that he gets to the ball in the red zone before X10 spins in behind him
Primary Players
O5 quickly MAKES A DECISION moves on the execution of the pass and marks the OUTSIDE SHOULDER of X10
Key Technical Detail
O5 on the front foot
Decision if he can intercept on the outside of X10 should the ball go to his feet and not in the Red Zone
NOT GET TURNED by X10
Secondary Players
O4 covers X9 with a defensive triangle on the inside of O5
Provides cover and balance for O5
Cover and Balance in Other Situations
Key Coaching Aspects
Players will have to make decisions quickly on which shoulder to mark and cover
Also when they go tight or make and command space
Players only go tight when the player is a threat!!
O11 – Blocking the Outside Shoulder to force X2 in field
O5 Marking the Outside Shoulder of X10 to defend the red zone stop him turning
O4 provides cover and balance Covering on the Inside Shoulder of X9 and his own O5
O8 Covers the outside shoulder of X6 to Screen the pass to X10 feet
O6 Covers the Inside Shoulder of X8 and O8 screening the pass to X9 yet covering the run of X8
GK command the area behind the defensive unit

See the guidance at the top of this page to understand why you are not seeing interactive Football/Soccer images.
SSG
Setup
Bues (coached) 1-2-3-3
Reds - 1-4-3-1
Do the players show an understanding of:-
Know how to press and drop?
Angles of press to push players into areas?
Understand where and where tackle and win the ball cleanly ?
When do you
Press?
Drop
Mark which side?
Try and intercept
Track
Cover
Mark Tight
Mark Space
'%3E%3Cpath id='path4169' d='M 11.4375,70.25 C 11.457031,38.394531 37.277344,13.242188 68.253906,13.050781 99.78125,12.855469 125.73047,38.351563 125.8125,70.078125 125.89844,101.62109 100.43359,127.14063 69.148438,127.42188 37.582031,127.70703 11.464844,102.23438 11.4375,70.25 m 6.425781,-0.08984 c 0.03516,28.421871 23.027344,50.69922 50.519532,50.82031 C 96.433594,121.10156 119.30469,98.367188 119.38281,70.359375 119.45313,42.878906 97.382813,19.714844 69.015625,19.496094 40.75,19.277344 17.964844,42.035156 17.863281,70.160156' style='clip-rule:nonzero;fill:%23333f48;fill-opacity:1;fill-rule:nonzero;stroke:none' /%3E%3Cpath style='fill:%23333f48;fill-opacity:1;fill-rule:nonzero;stroke:none' d='m 39.789063,108.62109 c 0.28125,0.14454 0.550781,0.32032 0.839843,0.4336 2.734375,1.05469 5.554688,1.78125 8.453125,2.23047 2.734375,0.42578 5.484375,0.64453 8.25,0.54297 3.988282,-0.15625 7.832032,-0.94922 11.445313,-2.69532 1.683594,-0.8164 3.246094,-1.82422 4.640625,-3.07422 3.265625,-2.92578 5.171875,-6.582027 5.796875,-10.906246 0.546875,-3.761719 0.04687,-7.425781 -1.09375,-11.019531 -1.4375,-4.523438 -3.730469,-8.582032 -6.703125,-12.265625 -1.03125,-1.277344 -2.082031,-2.535157 -3.113281,-3.808594 C 66.789063,66.1875 65.332031,64.269531 64.0625,62.21875 c -1.601562,-2.582031 -2.835937,-5.316406 -3.613281,-8.261719 -0.683594,-2.574218 -0.902344,-5.1875 -0.6875,-7.828125 0.214844,-2.617187 0.910156,-5.117187 2.152344,-7.441406 2.164062,-4.050781 5.503906,-6.710937 9.816406,-8.179687 1.890625,-0.640625 3.835937,-1.058594 5.832031,-1.195313 1.121094,-0.07813 2.242188,-0.152344 3.363281,-0.164062 4.28125,-0.02734 8.4375,0.734375 12.453125,2.175781 1.871094,0.671875 3.6875,1.496094 5.523438,2.257812 0.226562,0.09375 0.4375,0.230469 0.664062,0.351563 -0.164062,0.25 -0.371093,0.160156 -0.539062,0.164062 -2.824219,0.101563 -5.535156,0.703125 -8.132813,1.804688 -1.335937,0.570312 -2.570312,1.316406 -3.648437,2.296875 -2.527344,2.296875 -3.605469,5.15625 -3.34375,8.550781 0.140625,1.855469 0.722656,3.574219 1.550781,5.222656 0.648438,1.296875 1.414063,2.523438 2.292969,3.675782 0.953125,1.25 1.929687,2.484375 2.929687,3.699218 2.085938,2.523438 4.164063,5.054688 6.050782,7.738282 2.203125,3.136718 4.140627,6.417968 5.589847,9.980468 1.16406,2.867188 2.01562,5.820313 2.39843,8.894532 0.25,2.011718 0.30079,4.03125 0.11719,6.058593 -0.24219,2.640625 -0.79297,5.195313 -1.74609,7.667969 -1.29688,3.36328 -3.300784,6.22656 -5.972659,8.63281 -2.429687,2.19141 -5.171875,3.90625 -8.109375,5.3125 -2.695312,1.29297 -5.464843,2.40235 -8.34375,3.20313 -1.953125,0.54687 -3.945312,0.8789 -5.949218,1.15625 -3.035157,0.41797 -6.085938,0.48828 -9.132813,0.3125 -5.328125,-0.3125 -10.476562,-1.46094 -15.410156,-3.52344 -3.449219,-1.44141 -6.691406,-3.25781 -9.757813,-5.39453 -0.183593,-0.12891 -0.378906,-0.25 -0.53125,-0.41016 -0.07031,-0.0703 -0.05859,-0.22656 -0.08203,-0.34375 z m 0,0' id='path4175' /%3E%3Cpath style='fill:%23333f48;fill-opacity:1;fill-rule:nonzero;stroke:none' d='M 94.699219,29.390625 C 94.089844,29.21875 93.476563,29.054688 92.867188,28.875 90.183594,28.085938 87.46875,27.441406 84.703125,27.046875 c -3.976562,-0.566406 -7.945312,-0.59375 -11.863281,0.402344 -7.535156,1.914062 -12.386719,6.71875 -14.878906,13.996094 -0.894532,2.617187 -1.179688,5.328125 -0.953125,8.078125 0.203125,2.484375 0.867187,4.859375 1.816406,7.160156 0.933594,2.261719 2.117187,4.390625 3.4375,6.449219 1.4375,2.25 3.050781,4.371093 4.640625,6.511718 1.4375,1.933594 2.867187,3.871094 4.261719,5.835938 1.230468,1.730469 2.316406,3.546875 3.273437,5.445312 1.324219,2.625 2.265625,5.378907 2.703125,8.292969 0.433594,2.902344 0.292969,5.765625 -0.660156,8.5625 -0.9375,2.74609 -2.574219,5.00781 -4.777344,6.875 -2.417969,2.04688 -5.203125,3.39844 -8.246094,4.22266 -1.835937,0.5 -3.703125,0.75781 -5.609375,0.82031 -3.886718,0.13281 -7.679687,-0.47266 -11.421875,-1.46094 -2.261718,-0.59765 -4.488281,-1.33203 -6.695312,-2.11328 -0.207031,-0.0742 -0.40625,-0.16797 -0.597656,-0.25 -0.02344,-0.24609 0.148437,-0.19141 0.25,-0.20703 1.96875,-0.30469 3.921875,-0.67969 5.804687,-1.34766 1.367188,-0.48437 2.671875,-1.10156 3.855469,-1.94922 2.25,-1.61328 3.65625,-3.765621 4.0625,-6.515621 0.273437,-1.867188 0.09375,-3.710938 -0.429688,-5.527344 -0.472656,-1.648437 -1.171875,-3.199219 -2.109375,-4.628906 -0.792968,-1.207031 -1.636718,-2.382813 -2.523437,-3.519531 -0.921875,-1.195313 -1.921875,-2.328125 -2.890625,-3.484375 -2.753906,-3.273438 -5.351563,-6.660157 -7.523438,-10.355469 -2.042968,-3.480469 -3.667968,-7.136719 -4.597656,-11.078125 -0.640625,-2.699219 -0.980469,-5.4375 -0.832031,-8.214844 0.238281,-4.53125 1.476562,-8.78125 3.824219,-12.6875 1.082031,-1.800781 2.445312,-3.375 3.988281,-4.800781 2.742187,-2.527344 5.863281,-4.480469 9.257812,-5.992188 3.746094,-1.667968 7.652344,-2.769531 11.707032,-3.394531 3.152343,-0.488281 6.324218,-0.671875 9.507812,-0.519531 8.632813,0.410156 16.671875,2.792969 24,7.433594 0.08203,0.05078 0.152344,0.109375 0.230469,0.167968 -0.0039,0.04297 -0.0078,0.08984 -0.01563,0.136719' id='path4177' /%3E%3Cpath style='fill:%23333f48;fill-opacity:1;fill-rule:nonzero;stroke:none' d='m 31.699219,38.75 c -0.07813,0.238281 -0.152344,0.476563 -0.238281,0.710938 -1.460938,4.074218 -2.066407,8.28125 -1.808594,12.59375 0.4375,7.304687 2.808594,13.925781 7.277344,19.753906 3.714843,4.84375 7.441406,9.671875 11.167968,14.503906 1.113282,1.441406 1.953125,3.007813 2.414063,4.777344 0.332031,1.257812 0.425781,2.539062 0.273437,3.820312 -0.214843,1.832032 -1.070312,3.34375 -2.464843,4.546875 -0.984375,0.851559 -2.113282,1.449219 -3.316407,1.925779 -1.378906,0.54297 -2.8125,0.89063 -4.273437,1.1211 -2.226563,0.35547 -4.46875,0.46093 -6.722656,0.41015 -0.589844,-0.0156 -1.046875,-0.18359 -1.433594,-0.625 -0.636719,-0.72265 -1.335938,-1.39062 -1.9375,-2.14062 C 25.574219,93.800781 22.300781,86.621094 20.84375,78.636719 20.152344,74.835938 19.917969,71 20.15625,67.128906 20.796875,56.773438 24.390625,47.574219 30.859375,39.480469 c 0.21875,-0.273438 0.453125,-0.53125 0.679688,-0.796875 0.05469,0.02344 0.109375,0.04297 0.160156,0.06641' id='path4179' /%3E%3Cpath style='fill:%23333f48;fill-opacity:1;fill-rule:nonzero;stroke:none' d='m 105.41016,101.30078 c -0.13282,-0.3125 0.0234,-0.5039 0.0977,-0.69922 1.38672,-3.749997 1.98047,-7.628904 1.89844,-11.621091 -0.14453,-6.84375 -2.08594,-13.144531 -5.73437,-18.925781 C 99.890625,67.226563 97.917969,64.53125 95.835938,61.917969 94.4375,60.160156 92.988281,58.4375 91.582031,56.6875 90.632813,55.511719 89.6875,54.335938 88.792969,53.121094 c -0.835938,-1.144531 -1.488281,-2.398438 -1.953125,-3.742188 -0.523438,-1.515625 -0.695313,-3.070312 -0.511719,-4.652343 0.21875,-1.839844 1.082031,-3.339844 2.476563,-4.542969 1.039062,-0.890625 2.230468,-1.507813 3.503906,-1.980469 1.632812,-0.609375 3.320312,-0.960937 5.046875,-1.175781 1.917969,-0.238281 3.839841,-0.269531 5.769531,-0.230469 0.52734,0.01172 0.89453,0.203125 1.23828,0.585938 5.50391,6.113281 9.26172,13.144531 11.21875,21.132812 1.11719,4.554688 1.5625,9.179688 1.30469,13.855469 -0.58203,10.625 -4.23438,20.082031 -10.96094,28.339846 -0.15625,0.1914 -0.32812,0.375 -0.51562,0.58984' id='path4181' /%3E%3Cpath style='fill:%23333f48;fill-opacity:1;fill-rule:nonzero;stroke:none' d='m 39.796875,108.63281 c -0.05859,0.0117 -0.117187,0.0234 -0.175781,0.0352 0.05469,-0.0156 0.113281,-0.0312 0.167969,-0.0469 z m 0,0' id='path4183' /%3E%3C/g%3E%3C/svg%3E)

 Play animation
 Play step-by-step
 Repeat (toggle)
 Full Screen
 Pause
Pause Stop
Stop
Setup
Set up No1 – Covering Space in behind – The Red Zone
Defending Os GK- 2 – 2 – T
Attacking Xs T – 2 - 2
Organisation
The target player (T) can be used for both teams to recycle the ball and keep the game flowing, the defending team can score by passing to the target player.
Area coned off to work on middle AND DEFENDING third but in central areas
The Start Point No1
O6 try's to pass to O8 but X6 intercepts.
X6 immediately try's to pass in behind advancing defenders
Note that Central Defenders will push out when the pass goes from O6 to O8