


Hockey Session (Senior): 3-2-3-2 Pressing
Profile Summary

| Name: | Robert Dent |
|---|---|
| City: | Cheltenham |
| Country: | United Kingdom |
| Membership: | Adult Member |
| Sport: | Hockey |
Description
3-2-3-2 Pressing structure and patterns.
Includes when opposition transition to a back 3, and then how a possible outlet from them would result in our players (white) responding.
Ideally holding shape as much as possible - it may be skewed slightly, but still looking to create a picture similar to a 3-2-3-2 when possible.
Discipline and communication are vital for this to be effective.
Once a turnover is made, we will then be in a great counter attacking position to offer height, width and depth to the attack.
Consider knowing when to go 100% and try and dictate a turnover (ie full press 100%) or when to contain and regain the structure if players have been dragged out of position. A great way for this is traffic lights/colours.
For example, Green, being the call to go and win the ball. Every player steps up and as an in sync unit everyone applies pressure, closest 1-2 players apply ball pressure and the rest of the team step in front of their opposition player to set a true dominance on the press.
Opposing that, Red could be the colour and call to reshape and regain the structure if players are out of position, or opposition are looking to play fast hockey. Think of this as more of a containment period after scoring (or conceding), in which the following few minutes are the most vulnerable minutes.
See the guidance at the top of this page to understand why you are not seeing interactive Hockey images.
See the guidance at the top of this page to understand why you are not seeing interactive Hockey images.
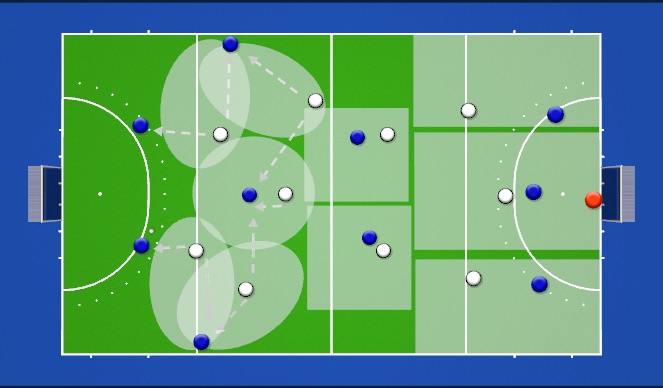
Animated Press 1
Initial setup: 3-2-3-2
Effectively a man to man in zone press. Be responsible for your zones. Don't have to be touch tight, but close enough to apply pressure and/or deny the pass.
Everyone should move laterally towards the closest 2/3 of the pitch.
See the guidance at the top of this page to understand why you are not seeing interactive Hockey images.
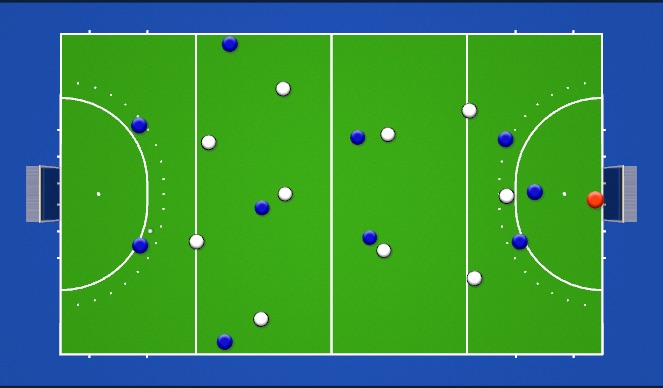
Press vs Back 3
Initial Setup: 3-2-3-2Back 3: responsible for oppo strikers - remain in your zone. If they change laterally between zones that's fine, communicate it and make each other aware - should be a lot of talking between you. Important we hold our shape and structure at the back. It's fine if they have 2 players in 1 zone, the free zone just needs to sit narrower in their zone to adjust for this. Touch tight man marking in final third of pitch. Win the race to the ball.
Screens/DM: Ensure hold your space. Remain in middle third of pitch to protect hotline. If the oppo midfielderdrops deepertowards their back line, please communicate this with our other midfielders to ensure everyone knows - don't follow too high as we will b out of shape and then vulnerable. Move laterally together - imagine piece of string between you and need to keep it tight, as one moves over, the other follows.
Midfield 3: CM marking oppo CM - touch tight and ideally preventing outlet through them. Force them wide where possible. Help side midfield narrow - may be able to mark CM and push our CM to be a free player if communicated well. If they slide ball round again, then need to communicate that midfielder goes wide, CM moves over, and new help side mid is narrow. Protect middle 2/3 of pitch.
Strikers: Responsible for oppo CB. Doing 1.5 jobs, marking CB but also trying to limit passing options - dictate the play and try to create a picture in our favour. If we identify one CB is weak, we can press and split towards them.
If they roll to a back 3, then that wide midfielder (or Striker, depending on which of their back 4 progress) follows until they restructure to normal. If we can pass players off then great, but HAS TO BE COMMUNICATED so everyone knows the plan. Ideally we want to sit in a 3-2-3-2 structure for as long as we can. Protect the middle. Force them wide, win it in channels, and then change channel to go forward fast.
See the guidance at the top of this page to understand why you are not seeing interactive Hockey images.
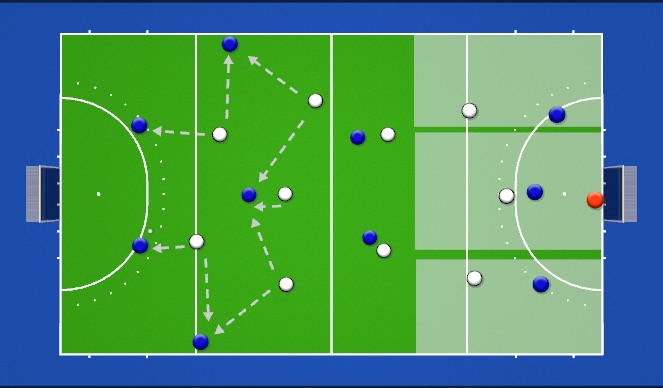
Oppo 3-2-3-2
If Opposition set up to start as a 3-2-3-2 (same formation as us), then we invert our structure (we are orange).
We do the following:
- 2 CB
- LH / RH / CM
- 2 Inners
- 3 Strikers.
Press remains the same.... Man to Man but hold your zones.
We will communicate this to you.
'%3E%3Cpath id='path4169' d='M 11.4375,70.25 C 11.457031,38.394531 37.277344,13.242188 68.253906,13.050781 99.78125,12.855469 125.73047,38.351563 125.8125,70.078125 125.89844,101.62109 100.43359,127.14063 69.148438,127.42188 37.582031,127.70703 11.464844,102.23438 11.4375,70.25 m 6.425781,-0.08984 c 0.03516,28.421871 23.027344,50.69922 50.519532,50.82031 C 96.433594,121.10156 119.30469,98.367188 119.38281,70.359375 119.45313,42.878906 97.382813,19.714844 69.015625,19.496094 40.75,19.277344 17.964844,42.035156 17.863281,70.160156' style='clip-rule:nonzero;fill:%23333f48;fill-opacity:1;fill-rule:nonzero;stroke:none' /%3E%3Cpath style='fill:%23333f48;fill-opacity:1;fill-rule:nonzero;stroke:none' d='m 39.789063,108.62109 c 0.28125,0.14454 0.550781,0.32032 0.839843,0.4336 2.734375,1.05469 5.554688,1.78125 8.453125,2.23047 2.734375,0.42578 5.484375,0.64453 8.25,0.54297 3.988282,-0.15625 7.832032,-0.94922 11.445313,-2.69532 1.683594,-0.8164 3.246094,-1.82422 4.640625,-3.07422 3.265625,-2.92578 5.171875,-6.582027 5.796875,-10.906246 0.546875,-3.761719 0.04687,-7.425781 -1.09375,-11.019531 -1.4375,-4.523438 -3.730469,-8.582032 -6.703125,-12.265625 -1.03125,-1.277344 -2.082031,-2.535157 -3.113281,-3.808594 C 66.789063,66.1875 65.332031,64.269531 64.0625,62.21875 c -1.601562,-2.582031 -2.835937,-5.316406 -3.613281,-8.261719 -0.683594,-2.574218 -0.902344,-5.1875 -0.6875,-7.828125 0.214844,-2.617187 0.910156,-5.117187 2.152344,-7.441406 2.164062,-4.050781 5.503906,-6.710937 9.816406,-8.179687 1.890625,-0.640625 3.835937,-1.058594 5.832031,-1.195313 1.121094,-0.07813 2.242188,-0.152344 3.363281,-0.164062 4.28125,-0.02734 8.4375,0.734375 12.453125,2.175781 1.871094,0.671875 3.6875,1.496094 5.523438,2.257812 0.226562,0.09375 0.4375,0.230469 0.664062,0.351563 -0.164062,0.25 -0.371093,0.160156 -0.539062,0.164062 -2.824219,0.101563 -5.535156,0.703125 -8.132813,1.804688 -1.335937,0.570312 -2.570312,1.316406 -3.648437,2.296875 -2.527344,2.296875 -3.605469,5.15625 -3.34375,8.550781 0.140625,1.855469 0.722656,3.574219 1.550781,5.222656 0.648438,1.296875 1.414063,2.523438 2.292969,3.675782 0.953125,1.25 1.929687,2.484375 2.929687,3.699218 2.085938,2.523438 4.164063,5.054688 6.050782,7.738282 2.203125,3.136718 4.140627,6.417968 5.589847,9.980468 1.16406,2.867188 2.01562,5.820313 2.39843,8.894532 0.25,2.011718 0.30079,4.03125 0.11719,6.058593 -0.24219,2.640625 -0.79297,5.195313 -1.74609,7.667969 -1.29688,3.36328 -3.300784,6.22656 -5.972659,8.63281 -2.429687,2.19141 -5.171875,3.90625 -8.109375,5.3125 -2.695312,1.29297 -5.464843,2.40235 -8.34375,3.20313 -1.953125,0.54687 -3.945312,0.8789 -5.949218,1.15625 -3.035157,0.41797 -6.085938,0.48828 -9.132813,0.3125 -5.328125,-0.3125 -10.476562,-1.46094 -15.410156,-3.52344 -3.449219,-1.44141 -6.691406,-3.25781 -9.757813,-5.39453 -0.183593,-0.12891 -0.378906,-0.25 -0.53125,-0.41016 -0.07031,-0.0703 -0.05859,-0.22656 -0.08203,-0.34375 z m 0,0' id='path4175' /%3E%3Cpath style='fill:%23333f48;fill-opacity:1;fill-rule:nonzero;stroke:none' d='M 94.699219,29.390625 C 94.089844,29.21875 93.476563,29.054688 92.867188,28.875 90.183594,28.085938 87.46875,27.441406 84.703125,27.046875 c -3.976562,-0.566406 -7.945312,-0.59375 -11.863281,0.402344 -7.535156,1.914062 -12.386719,6.71875 -14.878906,13.996094 -0.894532,2.617187 -1.179688,5.328125 -0.953125,8.078125 0.203125,2.484375 0.867187,4.859375 1.816406,7.160156 0.933594,2.261719 2.117187,4.390625 3.4375,6.449219 1.4375,2.25 3.050781,4.371093 4.640625,6.511718 1.4375,1.933594 2.867187,3.871094 4.261719,5.835938 1.230468,1.730469 2.316406,3.546875 3.273437,5.445312 1.324219,2.625 2.265625,5.378907 2.703125,8.292969 0.433594,2.902344 0.292969,5.765625 -0.660156,8.5625 -0.9375,2.74609 -2.574219,5.00781 -4.777344,6.875 -2.417969,2.04688 -5.203125,3.39844 -8.246094,4.22266 -1.835937,0.5 -3.703125,0.75781 -5.609375,0.82031 -3.886718,0.13281 -7.679687,-0.47266 -11.421875,-1.46094 -2.261718,-0.59765 -4.488281,-1.33203 -6.695312,-2.11328 -0.207031,-0.0742 -0.40625,-0.16797 -0.597656,-0.25 -0.02344,-0.24609 0.148437,-0.19141 0.25,-0.20703 1.96875,-0.30469 3.921875,-0.67969 5.804687,-1.34766 1.367188,-0.48437 2.671875,-1.10156 3.855469,-1.94922 2.25,-1.61328 3.65625,-3.765621 4.0625,-6.515621 0.273437,-1.867188 0.09375,-3.710938 -0.429688,-5.527344 -0.472656,-1.648437 -1.171875,-3.199219 -2.109375,-4.628906 -0.792968,-1.207031 -1.636718,-2.382813 -2.523437,-3.519531 -0.921875,-1.195313 -1.921875,-2.328125 -2.890625,-3.484375 -2.753906,-3.273438 -5.351563,-6.660157 -7.523438,-10.355469 -2.042968,-3.480469 -3.667968,-7.136719 -4.597656,-11.078125 -0.640625,-2.699219 -0.980469,-5.4375 -0.832031,-8.214844 0.238281,-4.53125 1.476562,-8.78125 3.824219,-12.6875 1.082031,-1.800781 2.445312,-3.375 3.988281,-4.800781 2.742187,-2.527344 5.863281,-4.480469 9.257812,-5.992188 3.746094,-1.667968 7.652344,-2.769531 11.707032,-3.394531 3.152343,-0.488281 6.324218,-0.671875 9.507812,-0.519531 8.632813,0.410156 16.671875,2.792969 24,7.433594 0.08203,0.05078 0.152344,0.109375 0.230469,0.167968 -0.0039,0.04297 -0.0078,0.08984 -0.01563,0.136719' id='path4177' /%3E%3Cpath style='fill:%23333f48;fill-opacity:1;fill-rule:nonzero;stroke:none' d='m 31.699219,38.75 c -0.07813,0.238281 -0.152344,0.476563 -0.238281,0.710938 -1.460938,4.074218 -2.066407,8.28125 -1.808594,12.59375 0.4375,7.304687 2.808594,13.925781 7.277344,19.753906 3.714843,4.84375 7.441406,9.671875 11.167968,14.503906 1.113282,1.441406 1.953125,3.007813 2.414063,4.777344 0.332031,1.257812 0.425781,2.539062 0.273437,3.820312 -0.214843,1.832032 -1.070312,3.34375 -2.464843,4.546875 -0.984375,0.851559 -2.113282,1.449219 -3.316407,1.925779 -1.378906,0.54297 -2.8125,0.89063 -4.273437,1.1211 -2.226563,0.35547 -4.46875,0.46093 -6.722656,0.41015 -0.589844,-0.0156 -1.046875,-0.18359 -1.433594,-0.625 -0.636719,-0.72265 -1.335938,-1.39062 -1.9375,-2.14062 C 25.574219,93.800781 22.300781,86.621094 20.84375,78.636719 20.152344,74.835938 19.917969,71 20.15625,67.128906 20.796875,56.773438 24.390625,47.574219 30.859375,39.480469 c 0.21875,-0.273438 0.453125,-0.53125 0.679688,-0.796875 0.05469,0.02344 0.109375,0.04297 0.160156,0.06641' id='path4179' /%3E%3Cpath style='fill:%23333f48;fill-opacity:1;fill-rule:nonzero;stroke:none' d='m 105.41016,101.30078 c -0.13282,-0.3125 0.0234,-0.5039 0.0977,-0.69922 1.38672,-3.749997 1.98047,-7.628904 1.89844,-11.621091 -0.14453,-6.84375 -2.08594,-13.144531 -5.73437,-18.925781 C 99.890625,67.226563 97.917969,64.53125 95.835938,61.917969 94.4375,60.160156 92.988281,58.4375 91.582031,56.6875 90.632813,55.511719 89.6875,54.335938 88.792969,53.121094 c -0.835938,-1.144531 -1.488281,-2.398438 -1.953125,-3.742188 -0.523438,-1.515625 -0.695313,-3.070312 -0.511719,-4.652343 0.21875,-1.839844 1.082031,-3.339844 2.476563,-4.542969 1.039062,-0.890625 2.230468,-1.507813 3.503906,-1.980469 1.632812,-0.609375 3.320312,-0.960937 5.046875,-1.175781 1.917969,-0.238281 3.839841,-0.269531 5.769531,-0.230469 0.52734,0.01172 0.89453,0.203125 1.23828,0.585938 5.50391,6.113281 9.26172,13.144531 11.21875,21.132812 1.11719,4.554688 1.5625,9.179688 1.30469,13.855469 -0.58203,10.625 -4.23438,20.082031 -10.96094,28.339846 -0.15625,0.1914 -0.32812,0.375 -0.51562,0.58984' id='path4181' /%3E%3Cpath style='fill:%23333f48;fill-opacity:1;fill-rule:nonzero;stroke:none' d='m 39.796875,108.63281 c -0.05859,0.0117 -0.117187,0.0234 -0.175781,0.0352 0.05469,-0.0156 0.113281,-0.0312 0.167969,-0.0469 z m 0,0' id='path4183' /%3E%3C/g%3E%3C/svg%3E)

 Play animation
 Play step-by-step
 Repeat (toggle)
 Full Screen
 Pause
Pause Stop
Stop
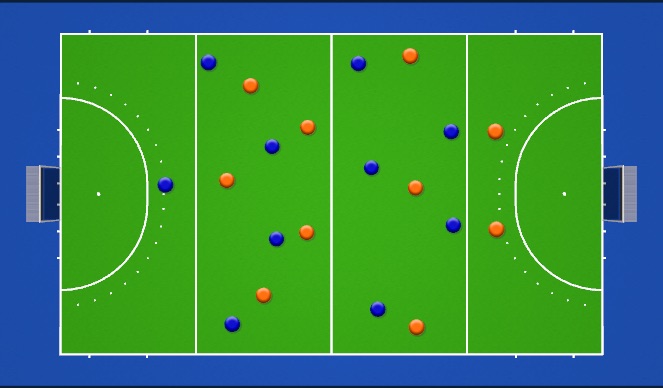
Initial Set Up: Press
Initial Setup: 3-2-3-2.Ovals/Squares represent each positional zone. For the position we are in, we have to dominate our zone. Oppo players will move between zones and try to disrupt us - but the more disciplined we are, the better the press will be and easy turnovers will come our way - leading to GOALLZZZ. If you find yourself out of position, please reset in to your original positions AND/OR communicate with team mates.
Back 3: responsible for oppo strikers - remain in your zone. If they change laterally between zones that's fine, communicate it and make each other aware - should be a lot of talking between you. Important we hold our shape and structure at the back. It's fine if they have 2 players in 1 zone, the free zone just needs to sit narrower in their zone to adjust for this. Touch tight man marking in final third of pitch. Win the race to the ball.
Screens/DM: Ensure hold your space. Remain in middle third of pitch to protect hotline. If the oppo midfielder drops deeper towards their back line, please communicate this with our other midfielders to ensure everyone knows - don't follow too high as we will b out of shape and then vulnerable. Move laterally together - imagine piece of string between you and need to keep it tight, as one moves over, the other follows.
Midfield 3: CM marking oppo CM - touch tight and ideally preventing outlet through them. Force them wide where possible. Help side midfield narrow - may be able to mark CM and push our CM to be a free player if communicated well. If they slide ball round again, then need to communicate that midfielder goes wide, CM moves over, and new help side mid is narrow. Protect middle 2/3 of pitch.
Strikers: Responsible for oppo CB. Doing 1.5 jobs, marking CB but also trying to limit passing options - dictate the play and try to create a picture in our favour. If we identify one CB is weak, we can press and split towards them.