


Football/Soccer Session (Academy Sessions): Function (9) - Defending with a midfield diamond.

Reseller-Club: Premier Users' Club
Billy Fuller
Profile Summary

| Name: | Billy Fuller |
|---|---|
| City: | Prestatyn |
| Country: | United Kingdom |
| Membership: | Adult Member |
| Sport: | Football/Soccer |
Description
See the guidance at the top of this page to understand why you are not seeing interactive Football/Soccer images.
See the guidance at the top of this page to understand why you are not seeing interactive Football/Soccer images.
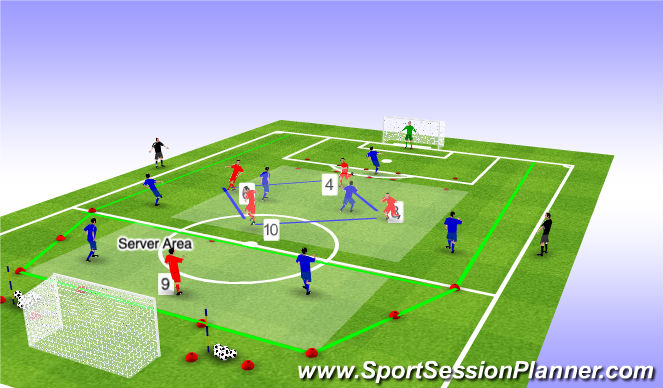
Playing Around/Through. Problem 1 (10 mins)
Conditions - Blues in Server area not allowed to come out of there. Blues are trying to play round and through, not OVER! If they want the switch, it has to go via a player in the Server Area.
Reds - Not to go over the halfway line & allow the ball to come out of the Serving Area. The Red CF starting position is the edge of the serving area next to the halfway line. He is active soon as the practice begins. The blue CF is to stay in the small disced area for the first part of the drill then is allowed into the wider disced area later on in the drill. (Will be told from the coach)
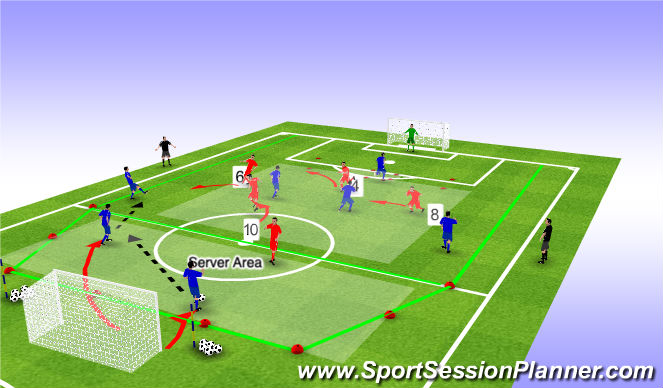
Organisation
- Coaching Positions as depicted. I may move into the FoP just like the Referee if I feel I am better situated.
- Managed Blue Team create the first problem:
Either Blue Centre Back start with the ball (need to split wide) and look to play wide around the Diamond. To show the trigger for the players the CB that is going to pass to the other CB will run towards the ball whilst concurrently the other CB will move wide. (As the arrows depict) This will initiate the trigger and better represents what is happening around & on the ball. (The red CF will try and close the first CB down and prevent him playing into the midfield wide areas, therefore adding another defensive layer)
- Centre Back finds feet of wide midfielder in an attempt to break the diamond shape and try and get the ball to the striker. (play direct, play through the diamond). Red CF carries on his defending from the front.
Coaching Points & Roles: Midfield Diamond
- Midfield Diamond trigger to react into a defensive shape and protect space is the initial pass from Deeper Centre Back (acting as a GK) to the other Centre Back. Once this pass has been played the diamond moves as follows:
- No.10 - Drops and screens the passes to the 2 Centre Midfielders. He makes the pass difficult and sets the trap to be close enough to the Midfielders so that if pass is made they can be either caught out or if they have a bad first touch their second touch becomes a tackle therefore we have displayed a desire to regain the ball and have reacted quickly in our defensive transition.
- No.6 - Presses immediately in line to the opposition wide player. In doing so he shows him outside towards the touch line.
- No.4 - Drops deeper and further right to become a screen to block the pass off to the strikers feet. He has to be aware that if he drops too deep he allows the CM more space on the peripheries of Zone 14, therefore if the ball is going to be played into the CM he will then have to re-dress the situation & press Centre Midfielder tight to force him back & therefore protect the space between the unit).
- No.8 moves inside in line with edge of 6 yard box (close to the far Centre Midfielder). This player has to be constantly aware when 'Off the ball' as with a quick switch the Right Midfielder will try and find the forward players. By remaining tight to the CM he will ensure that the Diamond has protected the middle and shown away from goal as per the Welsh Game Model.
See the guidance at the top of this page to understand why you are not seeing interactive Football/Soccer images.
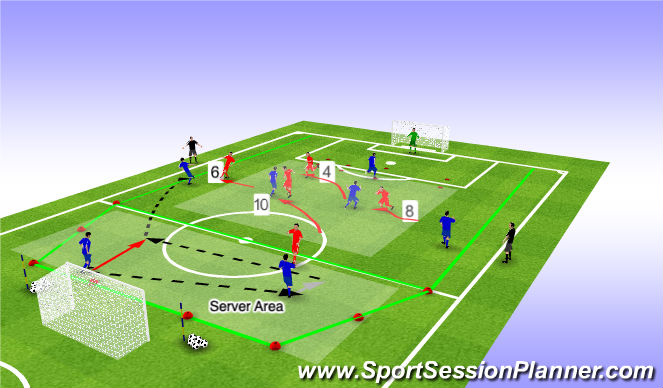
Progression, switches both long & short. (10 mins)
Conditions- Same as the previous slide with exception to an encouragement of switches by the managed Blues, short (& long once the progression has been given.) The blue CF now has his zone extended as the discs depict.
Organisation
- Coaching Positions as depicted. I may move into the FoP just like the Referee if I feel I am better situated.
Blue (Managed) team create a problem:
- If the shape is compact and tight (no gaps through) you can switch the play quickly. Why? This will facilitate gaps to open on the pitch and therefore a better chance of breaking the Diamonds Defensive shape.
How? This will start by the ball being played by the Centre Back (as a GK) to the other Centre back, he carries to assess the situation then decides to play a quick switch. (As depicted above)
Coaching Points & Roles: Midfield Diamond
- Midfield diamond trigger to react to the switch is when the ball is transferring from one side of the pitch to the other:
THEREFORE-
- No.4 - From marking the nearest Centre Midfielder, when ball is transferred drops deep to prevent the pass directly into the forward.
- No.6 - From marking the far Centre midfield, when the ball is transferred moves across to apply pressure on the wide player (Not too tight because it become a passing lane through the midfield).
- No.8 - From applying pressure to the wide player, tucks around when the ball is transferred to opposite the 6 yard box and therefore closer to the far Centre Midfield player, ensuring that the space in between is not compromised further & a better example of protecting the middle.
- No.10 - From preventing a pass into the 2 Centre Midfielders (Screening), when the ball is transferred he takes more of a defensive shape and gets goal-side tighter to the nearest Centre Midfielder. This will prevent any quick combination play forward and make them play backwards (if they do force it and go forward, Red Team have more of a chance of winning the ball and scoring). Alternatively, he could if the 8 is caught out of position (What if's) go slightly more central and split the 2 CM's and screen them to force play into areas of HIS CHOOSING and ensure central areas are denied to the opposition.
Progression - Long switches now in play to highlight how quickly a Midfield Diamond can get dis-organised.
What if the play is switched too quick (LONG) by a Blue player and players can’t get position in time?
The Solution to this is to force play wider. How? - The Centre Midfielder (No.6) stays narrow showing them wide however stops the pass into central areas. This will ensure that he still keeps the gap tight through the middle till the players come across, therefore the integrity of the Midfield Diamond remains through What if's. This pushes play wide away from goal. As an additional point it is worthy of note that the players can also know this is an imminent play (long switch) when the oppositions body position is showing that angle of the ball and the angled approach displayed to execute said long switch. Players need to move in unison.
Nice simple Acronym when pertinent for defensive shape is PRESS.
Pressure 1st touch
Reduce options
Encourage mistakes
Squeeze as an Individual
Squeeze as a Unit
See the guidance at the top of this page to understand why you are not seeing interactive Football/Soccer images.
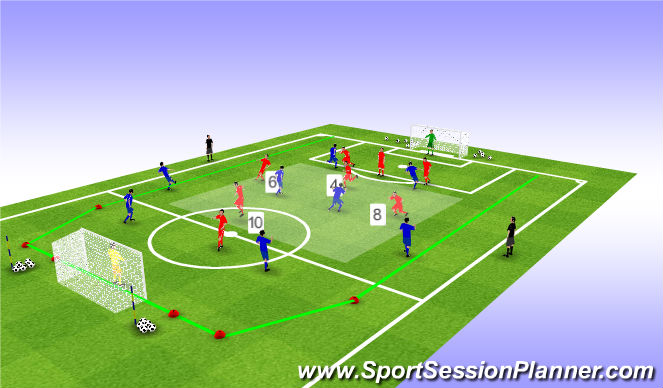
Small Sided Game (25 mins)
Organisation
- Changed the Drill into an SSG by adding a GK & a CF for the Blue Team. The Red team now also have their 3 CBs. Play will also restart where the ball left the FoP & now not just solely restart with the Blue CB's. Play to begin the SSG will start with the Blue GK.
- Time limit for scoring is improved for the Red Team as they now have 15 seconds to get a shot on goal. This still sets the conditions for what I want to achieve with Blues dominating possession without the constraint of time & the Reds being encouraged to be positive in their play.
- Condition - Blue centre backs don’t play higher than half way, due to being game realistic and protecting the goal against the counter. Red CF, will stay as deep as possible (remaining onside) in order to keep the CBs in their own half and not have a 1 on 1. This alleviates the What if's of a CB going further forward and trying to get overloads against the diamond. If the possibility of a progression is there, allow the CB to venture forward over the halfway line, the CF can follow if need be to neutralise the overload.
- Back 3 (Reds) work more as a Unit, shuffling and helping out the Diamond in wider areas. They will remain in a defensive posture, I only want them to move forward if their man (CF) tries to overload the MD, therefore it will negate that overload.
- Coaching Positions as depicted. I may move into the FoP just like the Referee if I feel I am better situated.
Formation
Red team: Gk-3-(MD1-2-1)-1 (GK, 3 Defenders, 1 Defensive Midfielder, 2 Centre Midfielders, 1 Attacking Midfielder, CF).
Blue Team: GK-2-4-2 (Gk, 2 Defenders, 4 Midfielders, 2 Forwards)
What If's - Red CF is not available to receive the ball from the MD due to position and marking? He will move position & on the trigger to receive from his diamond he will drop his shoulder/dummy run get his arm across his marker to get goal side and receive. Dependant on where on the pitch he is, he could also go wider to create the space in front/side to then get across his marker. With this in mind, the 10 can move into the space created by the CF and exploit thereafter. If this is the case, the CF go wide, take a player with you and anticipate either the pass or rebound. On transition, CF do whatever is necessary (prevent GK playing the quick ball / run across the CB / screen the most likely pass to stop the blues playing forward quickly to facilitate the 10 to get back into position.
What If's - Blues CB goes forward (into the MD) to create the overload. As discussed briefly above, the CF can also make his move with him to neutralise this. He can do this by being an arms length away, on the trigger of him receiving get your body across his to either prevent him receiving which will slow play or buy a foul as he has to come through you to receive the ball. If you dis-possess the Blues then quick interplay with your 10 is essential in getting off the shot. The CF on the 10 then receiving is to peel off and anticipate either the ball played through or the rebound. On doing all of this, the Blue CB has also to be mindful of leaving his other CB with a 1 on 1, which is not game realistic unless you're 1 - 0 down with 10 to play.
What If's - Blues keep receiving the ball in the wider areas un-opposed. The wider players of the diamond do not need to get touch tight, they need to screen the pass into their supporting players and prevent them from hitting areas around the box. If the wide players receive in wide areas adjacent to the box then the MD has been compromised. With too many scenarios to cover a simple explaination near the box would be for the CB to close, and as that leaves a 2 on 2, the MD number 4 would drop further to add protection and ensure the central areas around zone 14 are more compact.
'%3E%3Cpath id='path4169' d='M 11.4375,70.25 C 11.457031,38.394531 37.277344,13.242188 68.253906,13.050781 99.78125,12.855469 125.73047,38.351563 125.8125,70.078125 125.89844,101.62109 100.43359,127.14063 69.148438,127.42188 37.582031,127.70703 11.464844,102.23438 11.4375,70.25 m 6.425781,-0.08984 c 0.03516,28.421871 23.027344,50.69922 50.519532,50.82031 C 96.433594,121.10156 119.30469,98.367188 119.38281,70.359375 119.45313,42.878906 97.382813,19.714844 69.015625,19.496094 40.75,19.277344 17.964844,42.035156 17.863281,70.160156' style='clip-rule:nonzero;fill:%23333f48;fill-opacity:1;fill-rule:nonzero;stroke:none' /%3E%3Cpath style='fill:%23333f48;fill-opacity:1;fill-rule:nonzero;stroke:none' d='m 39.789063,108.62109 c 0.28125,0.14454 0.550781,0.32032 0.839843,0.4336 2.734375,1.05469 5.554688,1.78125 8.453125,2.23047 2.734375,0.42578 5.484375,0.64453 8.25,0.54297 3.988282,-0.15625 7.832032,-0.94922 11.445313,-2.69532 1.683594,-0.8164 3.246094,-1.82422 4.640625,-3.07422 3.265625,-2.92578 5.171875,-6.582027 5.796875,-10.906246 0.546875,-3.761719 0.04687,-7.425781 -1.09375,-11.019531 -1.4375,-4.523438 -3.730469,-8.582032 -6.703125,-12.265625 -1.03125,-1.277344 -2.082031,-2.535157 -3.113281,-3.808594 C 66.789063,66.1875 65.332031,64.269531 64.0625,62.21875 c -1.601562,-2.582031 -2.835937,-5.316406 -3.613281,-8.261719 -0.683594,-2.574218 -0.902344,-5.1875 -0.6875,-7.828125 0.214844,-2.617187 0.910156,-5.117187 2.152344,-7.441406 2.164062,-4.050781 5.503906,-6.710937 9.816406,-8.179687 1.890625,-0.640625 3.835937,-1.058594 5.832031,-1.195313 1.121094,-0.07813 2.242188,-0.152344 3.363281,-0.164062 4.28125,-0.02734 8.4375,0.734375 12.453125,2.175781 1.871094,0.671875 3.6875,1.496094 5.523438,2.257812 0.226562,0.09375 0.4375,0.230469 0.664062,0.351563 -0.164062,0.25 -0.371093,0.160156 -0.539062,0.164062 -2.824219,0.101563 -5.535156,0.703125 -8.132813,1.804688 -1.335937,0.570312 -2.570312,1.316406 -3.648437,2.296875 -2.527344,2.296875 -3.605469,5.15625 -3.34375,8.550781 0.140625,1.855469 0.722656,3.574219 1.550781,5.222656 0.648438,1.296875 1.414063,2.523438 2.292969,3.675782 0.953125,1.25 1.929687,2.484375 2.929687,3.699218 2.085938,2.523438 4.164063,5.054688 6.050782,7.738282 2.203125,3.136718 4.140627,6.417968 5.589847,9.980468 1.16406,2.867188 2.01562,5.820313 2.39843,8.894532 0.25,2.011718 0.30079,4.03125 0.11719,6.058593 -0.24219,2.640625 -0.79297,5.195313 -1.74609,7.667969 -1.29688,3.36328 -3.300784,6.22656 -5.972659,8.63281 -2.429687,2.19141 -5.171875,3.90625 -8.109375,5.3125 -2.695312,1.29297 -5.464843,2.40235 -8.34375,3.20313 -1.953125,0.54687 -3.945312,0.8789 -5.949218,1.15625 -3.035157,0.41797 -6.085938,0.48828 -9.132813,0.3125 -5.328125,-0.3125 -10.476562,-1.46094 -15.410156,-3.52344 -3.449219,-1.44141 -6.691406,-3.25781 -9.757813,-5.39453 -0.183593,-0.12891 -0.378906,-0.25 -0.53125,-0.41016 -0.07031,-0.0703 -0.05859,-0.22656 -0.08203,-0.34375 z m 0,0' id='path4175' /%3E%3Cpath style='fill:%23333f48;fill-opacity:1;fill-rule:nonzero;stroke:none' d='M 94.699219,29.390625 C 94.089844,29.21875 93.476563,29.054688 92.867188,28.875 90.183594,28.085938 87.46875,27.441406 84.703125,27.046875 c -3.976562,-0.566406 -7.945312,-0.59375 -11.863281,0.402344 -7.535156,1.914062 -12.386719,6.71875 -14.878906,13.996094 -0.894532,2.617187 -1.179688,5.328125 -0.953125,8.078125 0.203125,2.484375 0.867187,4.859375 1.816406,7.160156 0.933594,2.261719 2.117187,4.390625 3.4375,6.449219 1.4375,2.25 3.050781,4.371093 4.640625,6.511718 1.4375,1.933594 2.867187,3.871094 4.261719,5.835938 1.230468,1.730469 2.316406,3.546875 3.273437,5.445312 1.324219,2.625 2.265625,5.378907 2.703125,8.292969 0.433594,2.902344 0.292969,5.765625 -0.660156,8.5625 -0.9375,2.74609 -2.574219,5.00781 -4.777344,6.875 -2.417969,2.04688 -5.203125,3.39844 -8.246094,4.22266 -1.835937,0.5 -3.703125,0.75781 -5.609375,0.82031 -3.886718,0.13281 -7.679687,-0.47266 -11.421875,-1.46094 -2.261718,-0.59765 -4.488281,-1.33203 -6.695312,-2.11328 -0.207031,-0.0742 -0.40625,-0.16797 -0.597656,-0.25 -0.02344,-0.24609 0.148437,-0.19141 0.25,-0.20703 1.96875,-0.30469 3.921875,-0.67969 5.804687,-1.34766 1.367188,-0.48437 2.671875,-1.10156 3.855469,-1.94922 2.25,-1.61328 3.65625,-3.765621 4.0625,-6.515621 0.273437,-1.867188 0.09375,-3.710938 -0.429688,-5.527344 -0.472656,-1.648437 -1.171875,-3.199219 -2.109375,-4.628906 -0.792968,-1.207031 -1.636718,-2.382813 -2.523437,-3.519531 -0.921875,-1.195313 -1.921875,-2.328125 -2.890625,-3.484375 -2.753906,-3.273438 -5.351563,-6.660157 -7.523438,-10.355469 -2.042968,-3.480469 -3.667968,-7.136719 -4.597656,-11.078125 -0.640625,-2.699219 -0.980469,-5.4375 -0.832031,-8.214844 0.238281,-4.53125 1.476562,-8.78125 3.824219,-12.6875 1.082031,-1.800781 2.445312,-3.375 3.988281,-4.800781 2.742187,-2.527344 5.863281,-4.480469 9.257812,-5.992188 3.746094,-1.667968 7.652344,-2.769531 11.707032,-3.394531 3.152343,-0.488281 6.324218,-0.671875 9.507812,-0.519531 8.632813,0.410156 16.671875,2.792969 24,7.433594 0.08203,0.05078 0.152344,0.109375 0.230469,0.167968 -0.0039,0.04297 -0.0078,0.08984 -0.01563,0.136719' id='path4177' /%3E%3Cpath style='fill:%23333f48;fill-opacity:1;fill-rule:nonzero;stroke:none' d='m 31.699219,38.75 c -0.07813,0.238281 -0.152344,0.476563 -0.238281,0.710938 -1.460938,4.074218 -2.066407,8.28125 -1.808594,12.59375 0.4375,7.304687 2.808594,13.925781 7.277344,19.753906 3.714843,4.84375 7.441406,9.671875 11.167968,14.503906 1.113282,1.441406 1.953125,3.007813 2.414063,4.777344 0.332031,1.257812 0.425781,2.539062 0.273437,3.820312 -0.214843,1.832032 -1.070312,3.34375 -2.464843,4.546875 -0.984375,0.851559 -2.113282,1.449219 -3.316407,1.925779 -1.378906,0.54297 -2.8125,0.89063 -4.273437,1.1211 -2.226563,0.35547 -4.46875,0.46093 -6.722656,0.41015 -0.589844,-0.0156 -1.046875,-0.18359 -1.433594,-0.625 -0.636719,-0.72265 -1.335938,-1.39062 -1.9375,-2.14062 C 25.574219,93.800781 22.300781,86.621094 20.84375,78.636719 20.152344,74.835938 19.917969,71 20.15625,67.128906 20.796875,56.773438 24.390625,47.574219 30.859375,39.480469 c 0.21875,-0.273438 0.453125,-0.53125 0.679688,-0.796875 0.05469,0.02344 0.109375,0.04297 0.160156,0.06641' id='path4179' /%3E%3Cpath style='fill:%23333f48;fill-opacity:1;fill-rule:nonzero;stroke:none' d='m 105.41016,101.30078 c -0.13282,-0.3125 0.0234,-0.5039 0.0977,-0.69922 1.38672,-3.749997 1.98047,-7.628904 1.89844,-11.621091 -0.14453,-6.84375 -2.08594,-13.144531 -5.73437,-18.925781 C 99.890625,67.226563 97.917969,64.53125 95.835938,61.917969 94.4375,60.160156 92.988281,58.4375 91.582031,56.6875 90.632813,55.511719 89.6875,54.335938 88.792969,53.121094 c -0.835938,-1.144531 -1.488281,-2.398438 -1.953125,-3.742188 -0.523438,-1.515625 -0.695313,-3.070312 -0.511719,-4.652343 0.21875,-1.839844 1.082031,-3.339844 2.476563,-4.542969 1.039062,-0.890625 2.230468,-1.507813 3.503906,-1.980469 1.632812,-0.609375 3.320312,-0.960937 5.046875,-1.175781 1.917969,-0.238281 3.839841,-0.269531 5.769531,-0.230469 0.52734,0.01172 0.89453,0.203125 1.23828,0.585938 5.50391,6.113281 9.26172,13.144531 11.21875,21.132812 1.11719,4.554688 1.5625,9.179688 1.30469,13.855469 -0.58203,10.625 -4.23438,20.082031 -10.96094,28.339846 -0.15625,0.1914 -0.32812,0.375 -0.51562,0.58984' id='path4181' /%3E%3Cpath style='fill:%23333f48;fill-opacity:1;fill-rule:nonzero;stroke:none' d='m 39.796875,108.63281 c -0.05859,0.0117 -0.117187,0.0234 -0.175781,0.0352 0.05469,-0.0156 0.113281,-0.0312 0.167969,-0.0469 z m 0,0' id='path4183' /%3E%3C/g%3E%3C/svg%3E)
 Play animation
 Play step-by-step
 Repeat (toggle)
 Full Screen
 Pause
Pause Stop
Stop
Organisation (10 mins)
Organisation
Reds - Coached
Blues - Managed.
- Coaching Positions as depicted. I may move into the FoP just like the Referee if I feel I am better situated.
- The Session's objective is Defending with a Midfield Diamond (MD) and protecting space between the Unit. They will manage this by playing against 2 Wide players and 2 Centre Midfielders.
- The ball will always begin in the Server Zone with either one of the Centre Backs. When the ball is played out of that zone play is live. (Just like the opposition pen box on a GK/FK).
- Blues are awarded a goal by the CF receiving the ball behind the Midfield Diamond. (This then ensures that they have either played around or through the Defensive Midfield Diamond. Start of the practice the zone is the small central zone; Once the drill has progressed it will revert to the larger one depicted). The blues get awarded 2 goals if they score past the GK. The CF has 3 seconds to shoot.
- Red Team Score by also passing to their CF who is beyond the MD in the Serving Zone. (The Red team has to score within 7 seconds.)
Formations
- Red Team: GK-4-1 (GK, Defensive Midfielder, 2 Central Wider Players, Attacking Midfielder, CF).
- Blue Team: 2-4-1 (2 Centre Backs, 2 Central Midfielders, 2 Wide Players, 1 Forward).
- The Red Team as previously alluded to are coached on defending with a Midfield Diamond and the Blue team are managed to pose different problems to the Midfield Diamond.
- Red Team possess a Midfield Diamond minus 3 CBs.
- Blue Team are playing with a flat midfield minus their GK & their second CF.