


Hockey Session (Senior): Formation/structure
Profile Summary

| Name: | Edgar Kuijper |
|---|---|
| City: | Manchester |
| Country: | United Kingdom |
| Membership: | Adult Member |
| Sport: | Hockey |
Description
See the guidance at the top of this page to understand why you are not seeing interactive Hockey images.
See the guidance at the top of this page to understand why you are not seeing interactive Hockey images.
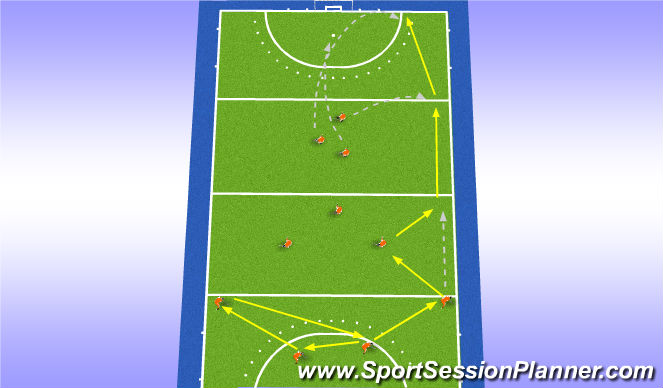
Out-letting options
Here is an out-letting option from the back moving forward using sup (small unit play)
- The play is built up from the back by transferring the ball. We do this to move the forwards and create space. We do this option from both sides. The ball pace is key here to creating the space.
- The forward line needs to start a little deeper and then look to break into key areas. We ask that the forwards most of the time stay together, so they can bunch the defenders up and therefore have more space to move into.
See the guidance at the top of this page to understand why you are not seeing interactive Hockey images.
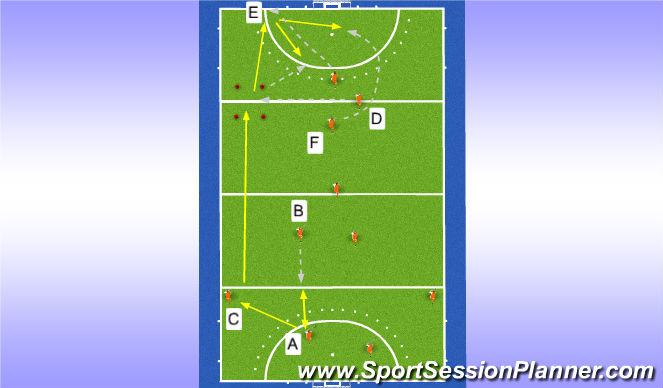
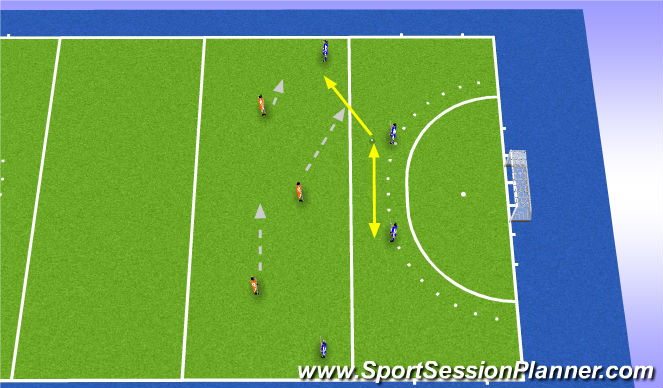
Out-lettng option
- 4 players at the back. A passes to the post up from B and receives the ball back and quickly passes it to C.
- C in two touches passes it into the boxed area (guideline for post up from forward)
- D makes a post up into the area and receives the ball, passes it to E whose made a baseline run
- E has the option to pass back to D by the top of the circle or to F whose made a penalty spot run.
- Can be done on both sides of the pitch
See the guidance at the top of this page to understand why you are not seeing interactive Hockey images.
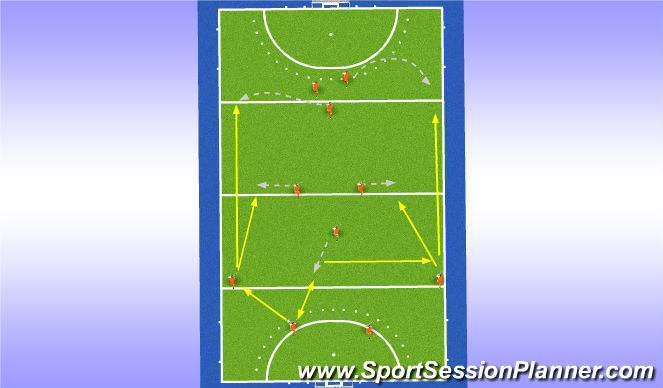
Out-letting option
- Here we have different options with the central player posting up and either passing it straight back or making a strong roll out and passing it to the right half back.
- The half back has two options, he can pass infield to a midfielder or down the line, it all depends what is available. make sure that the forwards recognise where the pass could go and look to post up.
See the guidance at the top of this page to understand why you are not seeing interactive Hockey images.
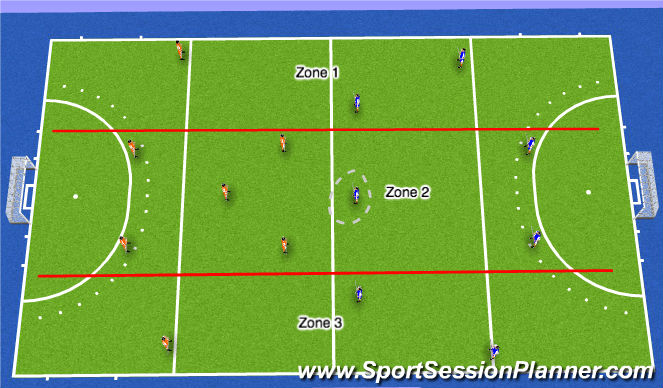
Midfield movement
As you can see I have split the pitch into three zones. For the midfield it is important that they primarily protect zone 2 using semi zonal marking. Semi zonal marking is where the midfield prioritize and man mark the opposition when they enter that zone. For the other zones, they can put pressure on, they don't necessarily have to apply man mark pressure. This is by in large due to the halfbacks being able to push up and cover the line balls. What this offers is compact and press-able positions when they have the ball on 16s/free hits. Plus it offers good defensive coverage. Just like the defence they should be fluid and able to interchange and follow their men.
When attacking, they should be able to make the grounds and get ahead. From what I've heard, you like to attack in groups. This set up allows for that. However, you will need to work on frontal vision when receiving the ball. Furthermore, the movement should be emphasised on getting ahead and always being a passing option. The midfield are there to support the forwards and bridge the gap between defence and forward line.
See the guidance at the top of this page to understand why you are not seeing interactive Hockey images.
Press
The forward line press. I'd recommend starting at a 65-70% depending on the team you play and how you think they defensively work.
The central forward whoever that is, their role is to work in between both the centre half's and aim to apply pressure when a bad ball has been given or if they lose control/have a bad touch. Moreover, they need to recognise when to move and where to when a ball has been given. The centre forward should look to move in between half back and the centre half.
The other forwards (left and right) should look to cut the inside balls off whether that down the channel or to the halfback if they've pushed up. If a ball has been given to the halfback they have the option to put pressure on and close them down with the central forward backing or cutting the ball off back to the centre half.
This press if the players work hard enough should make the defenders and the opponents midfield work really hard to get the ball. If the ball gets through their aim should be counter control and try to cover the midfield who are retreating. They should not just stay up top.
See the guidance at the top of this page to understand why you are not seeing interactive Hockey images.
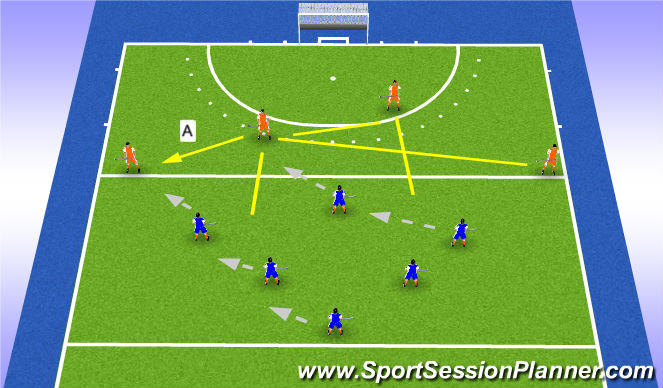
Press
The press from a birds eye view.
Set the press up as previously mentioned. The movement as shown by A becomes clear.
The role of the midfield is to man mark in the semi zonal zone whilst trying to maintain the structure of holding the gaps in between the forward line. This way if the ball gets past the forward line they are there to cover.
The ball down the channel/line at the end doesn't have to be covered. A halfback will cover that ball
'%3E%3Cpath id='path4169' d='M 11.4375,70.25 C 11.457031,38.394531 37.277344,13.242188 68.253906,13.050781 99.78125,12.855469 125.73047,38.351563 125.8125,70.078125 125.89844,101.62109 100.43359,127.14063 69.148438,127.42188 37.582031,127.70703 11.464844,102.23438 11.4375,70.25 m 6.425781,-0.08984 c 0.03516,28.421871 23.027344,50.69922 50.519532,50.82031 C 96.433594,121.10156 119.30469,98.367188 119.38281,70.359375 119.45313,42.878906 97.382813,19.714844 69.015625,19.496094 40.75,19.277344 17.964844,42.035156 17.863281,70.160156' style='clip-rule:nonzero;fill:%23333f48;fill-opacity:1;fill-rule:nonzero;stroke:none' /%3E%3Cpath style='fill:%23333f48;fill-opacity:1;fill-rule:nonzero;stroke:none' d='m 39.789063,108.62109 c 0.28125,0.14454 0.550781,0.32032 0.839843,0.4336 2.734375,1.05469 5.554688,1.78125 8.453125,2.23047 2.734375,0.42578 5.484375,0.64453 8.25,0.54297 3.988282,-0.15625 7.832032,-0.94922 11.445313,-2.69532 1.683594,-0.8164 3.246094,-1.82422 4.640625,-3.07422 3.265625,-2.92578 5.171875,-6.582027 5.796875,-10.906246 0.546875,-3.761719 0.04687,-7.425781 -1.09375,-11.019531 -1.4375,-4.523438 -3.730469,-8.582032 -6.703125,-12.265625 -1.03125,-1.277344 -2.082031,-2.535157 -3.113281,-3.808594 C 66.789063,66.1875 65.332031,64.269531 64.0625,62.21875 c -1.601562,-2.582031 -2.835937,-5.316406 -3.613281,-8.261719 -0.683594,-2.574218 -0.902344,-5.1875 -0.6875,-7.828125 0.214844,-2.617187 0.910156,-5.117187 2.152344,-7.441406 2.164062,-4.050781 5.503906,-6.710937 9.816406,-8.179687 1.890625,-0.640625 3.835937,-1.058594 5.832031,-1.195313 1.121094,-0.07813 2.242188,-0.152344 3.363281,-0.164062 4.28125,-0.02734 8.4375,0.734375 12.453125,2.175781 1.871094,0.671875 3.6875,1.496094 5.523438,2.257812 0.226562,0.09375 0.4375,0.230469 0.664062,0.351563 -0.164062,0.25 -0.371093,0.160156 -0.539062,0.164062 -2.824219,0.101563 -5.535156,0.703125 -8.132813,1.804688 -1.335937,0.570312 -2.570312,1.316406 -3.648437,2.296875 -2.527344,2.296875 -3.605469,5.15625 -3.34375,8.550781 0.140625,1.855469 0.722656,3.574219 1.550781,5.222656 0.648438,1.296875 1.414063,2.523438 2.292969,3.675782 0.953125,1.25 1.929687,2.484375 2.929687,3.699218 2.085938,2.523438 4.164063,5.054688 6.050782,7.738282 2.203125,3.136718 4.140627,6.417968 5.589847,9.980468 1.16406,2.867188 2.01562,5.820313 2.39843,8.894532 0.25,2.011718 0.30079,4.03125 0.11719,6.058593 -0.24219,2.640625 -0.79297,5.195313 -1.74609,7.667969 -1.29688,3.36328 -3.300784,6.22656 -5.972659,8.63281 -2.429687,2.19141 -5.171875,3.90625 -8.109375,5.3125 -2.695312,1.29297 -5.464843,2.40235 -8.34375,3.20313 -1.953125,0.54687 -3.945312,0.8789 -5.949218,1.15625 -3.035157,0.41797 -6.085938,0.48828 -9.132813,0.3125 -5.328125,-0.3125 -10.476562,-1.46094 -15.410156,-3.52344 -3.449219,-1.44141 -6.691406,-3.25781 -9.757813,-5.39453 -0.183593,-0.12891 -0.378906,-0.25 -0.53125,-0.41016 -0.07031,-0.0703 -0.05859,-0.22656 -0.08203,-0.34375 z m 0,0' id='path4175' /%3E%3Cpath style='fill:%23333f48;fill-opacity:1;fill-rule:nonzero;stroke:none' d='M 94.699219,29.390625 C 94.089844,29.21875 93.476563,29.054688 92.867188,28.875 90.183594,28.085938 87.46875,27.441406 84.703125,27.046875 c -3.976562,-0.566406 -7.945312,-0.59375 -11.863281,0.402344 -7.535156,1.914062 -12.386719,6.71875 -14.878906,13.996094 -0.894532,2.617187 -1.179688,5.328125 -0.953125,8.078125 0.203125,2.484375 0.867187,4.859375 1.816406,7.160156 0.933594,2.261719 2.117187,4.390625 3.4375,6.449219 1.4375,2.25 3.050781,4.371093 4.640625,6.511718 1.4375,1.933594 2.867187,3.871094 4.261719,5.835938 1.230468,1.730469 2.316406,3.546875 3.273437,5.445312 1.324219,2.625 2.265625,5.378907 2.703125,8.292969 0.433594,2.902344 0.292969,5.765625 -0.660156,8.5625 -0.9375,2.74609 -2.574219,5.00781 -4.777344,6.875 -2.417969,2.04688 -5.203125,3.39844 -8.246094,4.22266 -1.835937,0.5 -3.703125,0.75781 -5.609375,0.82031 -3.886718,0.13281 -7.679687,-0.47266 -11.421875,-1.46094 -2.261718,-0.59765 -4.488281,-1.33203 -6.695312,-2.11328 -0.207031,-0.0742 -0.40625,-0.16797 -0.597656,-0.25 -0.02344,-0.24609 0.148437,-0.19141 0.25,-0.20703 1.96875,-0.30469 3.921875,-0.67969 5.804687,-1.34766 1.367188,-0.48437 2.671875,-1.10156 3.855469,-1.94922 2.25,-1.61328 3.65625,-3.765621 4.0625,-6.515621 0.273437,-1.867188 0.09375,-3.710938 -0.429688,-5.527344 -0.472656,-1.648437 -1.171875,-3.199219 -2.109375,-4.628906 -0.792968,-1.207031 -1.636718,-2.382813 -2.523437,-3.519531 -0.921875,-1.195313 -1.921875,-2.328125 -2.890625,-3.484375 -2.753906,-3.273438 -5.351563,-6.660157 -7.523438,-10.355469 -2.042968,-3.480469 -3.667968,-7.136719 -4.597656,-11.078125 -0.640625,-2.699219 -0.980469,-5.4375 -0.832031,-8.214844 0.238281,-4.53125 1.476562,-8.78125 3.824219,-12.6875 1.082031,-1.800781 2.445312,-3.375 3.988281,-4.800781 2.742187,-2.527344 5.863281,-4.480469 9.257812,-5.992188 3.746094,-1.667968 7.652344,-2.769531 11.707032,-3.394531 3.152343,-0.488281 6.324218,-0.671875 9.507812,-0.519531 8.632813,0.410156 16.671875,2.792969 24,7.433594 0.08203,0.05078 0.152344,0.109375 0.230469,0.167968 -0.0039,0.04297 -0.0078,0.08984 -0.01563,0.136719' id='path4177' /%3E%3Cpath style='fill:%23333f48;fill-opacity:1;fill-rule:nonzero;stroke:none' d='m 31.699219,38.75 c -0.07813,0.238281 -0.152344,0.476563 -0.238281,0.710938 -1.460938,4.074218 -2.066407,8.28125 -1.808594,12.59375 0.4375,7.304687 2.808594,13.925781 7.277344,19.753906 3.714843,4.84375 7.441406,9.671875 11.167968,14.503906 1.113282,1.441406 1.953125,3.007813 2.414063,4.777344 0.332031,1.257812 0.425781,2.539062 0.273437,3.820312 -0.214843,1.832032 -1.070312,3.34375 -2.464843,4.546875 -0.984375,0.851559 -2.113282,1.449219 -3.316407,1.925779 -1.378906,0.54297 -2.8125,0.89063 -4.273437,1.1211 -2.226563,0.35547 -4.46875,0.46093 -6.722656,0.41015 -0.589844,-0.0156 -1.046875,-0.18359 -1.433594,-0.625 -0.636719,-0.72265 -1.335938,-1.39062 -1.9375,-2.14062 C 25.574219,93.800781 22.300781,86.621094 20.84375,78.636719 20.152344,74.835938 19.917969,71 20.15625,67.128906 20.796875,56.773438 24.390625,47.574219 30.859375,39.480469 c 0.21875,-0.273438 0.453125,-0.53125 0.679688,-0.796875 0.05469,0.02344 0.109375,0.04297 0.160156,0.06641' id='path4179' /%3E%3Cpath style='fill:%23333f48;fill-opacity:1;fill-rule:nonzero;stroke:none' d='m 105.41016,101.30078 c -0.13282,-0.3125 0.0234,-0.5039 0.0977,-0.69922 1.38672,-3.749997 1.98047,-7.628904 1.89844,-11.621091 -0.14453,-6.84375 -2.08594,-13.144531 -5.73437,-18.925781 C 99.890625,67.226563 97.917969,64.53125 95.835938,61.917969 94.4375,60.160156 92.988281,58.4375 91.582031,56.6875 90.632813,55.511719 89.6875,54.335938 88.792969,53.121094 c -0.835938,-1.144531 -1.488281,-2.398438 -1.953125,-3.742188 -0.523438,-1.515625 -0.695313,-3.070312 -0.511719,-4.652343 0.21875,-1.839844 1.082031,-3.339844 2.476563,-4.542969 1.039062,-0.890625 2.230468,-1.507813 3.503906,-1.980469 1.632812,-0.609375 3.320312,-0.960937 5.046875,-1.175781 1.917969,-0.238281 3.839841,-0.269531 5.769531,-0.230469 0.52734,0.01172 0.89453,0.203125 1.23828,0.585938 5.50391,6.113281 9.26172,13.144531 11.21875,21.132812 1.11719,4.554688 1.5625,9.179688 1.30469,13.855469 -0.58203,10.625 -4.23438,20.082031 -10.96094,28.339846 -0.15625,0.1914 -0.32812,0.375 -0.51562,0.58984' id='path4181' /%3E%3Cpath style='fill:%23333f48;fill-opacity:1;fill-rule:nonzero;stroke:none' d='m 39.796875,108.63281 c -0.05859,0.0117 -0.117187,0.0234 -0.175781,0.0352 0.05469,-0.0156 0.113281,-0.0312 0.167969,-0.0469 z m 0,0' id='path4183' /%3E%3C/g%3E%3C/svg%3E)

 Play animation
 Play step-by-step
 Repeat (toggle)
 Full Screen
 Pause
Pause Stop
Stop
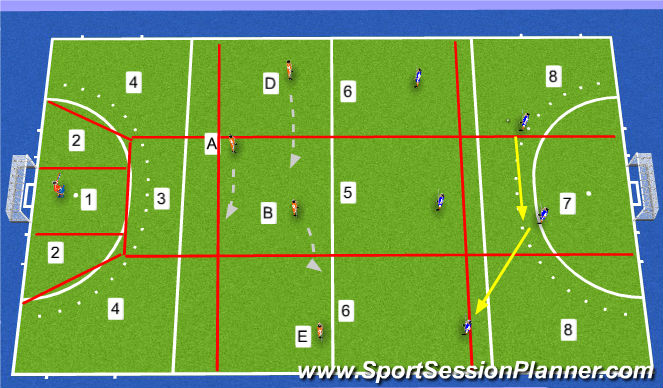
Defensive movement
Roles of the defenders
- One recommendation is to make one of the center half's a spare man. What this role entails; is that s(he) should be free the majority of the time, make call outs to other defenders on who they should be marking, along with where they need to be standing. Not only does that person do this for the defense, they should make sure the midfielders are set up where s(he) wants along with who they pick up to mark. This player should also be looking to maintain the ball, body goal line. On top of this they should look to try and intercept any through passes down the center. If a defender or midfielder gets eliminated, it is the spare mans responsibility to pick that player up and try to hold them up until the team can come and support them. This is the role of the center half.
- The other center half is to pick up and man mark and aid in the distribution and outletting process. Furthermore, they need to act like a washing machine, being able to swap sides of the pitch without a problem.
- The half backs D/E. Their role is to be available as an outletting option on 16s and free hits. Higher up on the pitch such as on long corners they should be wide and an option to go down the line or to enter the circle. Defensively, as previously mentioned they should be man marking. Ideally, they would follow that player around across the backline to the other side. Preferably they wouldn't shift that player on to another defender. (look at formation for the movement of defenders when the play gets shifter from side to side. When the ball gets transferred from right to left or vice versa. Half backs D/E should look to reposition themselves. It is important for them to know that they should be looking to protect the middle. If they don't they are standing marking space, that is useless. They effectively become eliminated in that situation.
- Another role/function of the defenders more importantly in this formation is not to try and make a great tackle. Rather we would prefer that they hold that player up and create time for a 2v1 situation. This gives us a higher chance of protecting the goal. However, having said that, if the opportunity arises to make a tackle and win it, then go for it. If you get eliminated in the 25 they effectively have a goal scoring opportunity.
- The red zones highlight the threat level of attacking opposition on the pitch. It is for these reasons why we encourage man to man marking as 1,2,3,4 require man to man to give the opposition as little time as possible on the ball. Furthermore, as previously mentioned, the movement of halfbacks into zone 5 from 6 is important. It provides more coverage and closes down the straight ball from zone 5.
- Overall, play man to man and make sure that they understand where they need to go to re position. Easy way to train is to get them to play a match and blow the whistle and stop to highlight these points. If they are in the wrong position get them to recognize that. On top of that, they need to be aware to not go and make that tackle unless certain they will win in it.