Football/Soccer Session (Academy Sessions): 1-4-3-3 - Positional Understanding BOYS 2000 ENY ODP

Profile Summary

| Name: | Jerome Vivona |
|---|---|
| City: | Westbury |
| Country: | United States of America |
| Membership: | Adult Member |
| Sport: | Football/Soccer |
Description
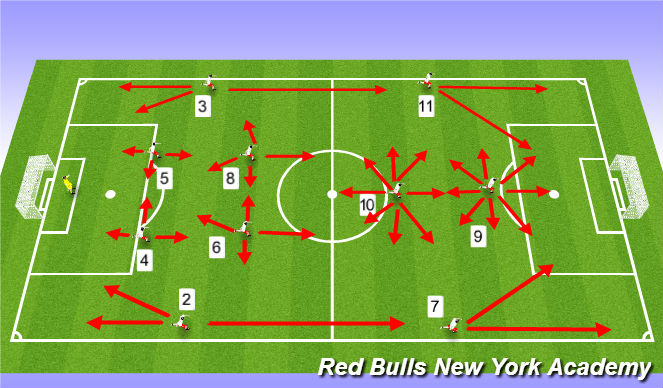
The 4-3-3 positional understanding
See the guidance at the top of this page to understand why you are not seeing interactive Football/Soccer images.

Triangle in Midfield - Playing with a #10
#10 refers to an attacking center-mid that plays behind the center-forward.
The #10 has the freedom to move everywhere across the attacking front. This player acts as a link up between the two holding midfielders and the forwards.
The #10 is a playmaker who both assists and scores. Defensively, the #10 helps apply high pressure.
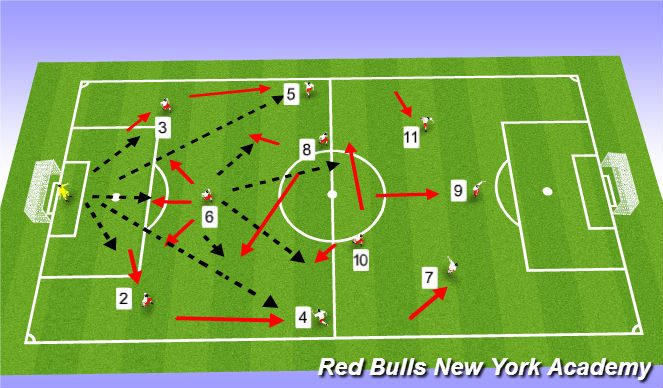
See the guidance at the top of this page to understand why you are not seeing interactive Football/Soccer images.

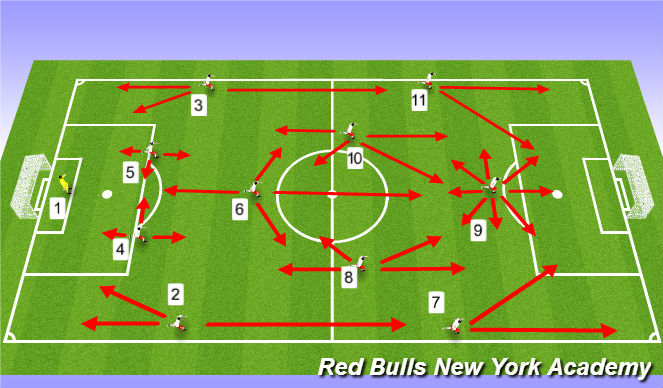
Build Out
Organization: # 2 & #3 spread wide, #'s 4 & 5 pushed high to the centre line, #6 central above back line, #8 & 10 Central, #7,9 & 11 high and tight.
Instructions: look to play in #2 and 3, then #4 or 5, #6 as release with #8 and 10 circulating on opposite lines but still connected and #7, 11 and 9 creating space for wingers and midfield to build out.
Coaching Points: Confident, Clear and attack minded
Progressions:
See the guidance at the top of this page to understand why you are not seeing interactive Football/Soccer images.

Throw ins
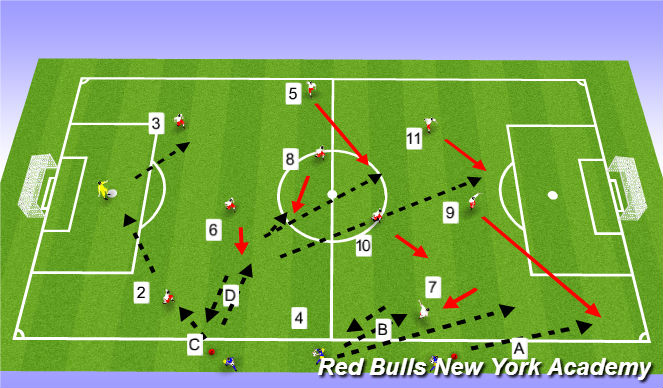
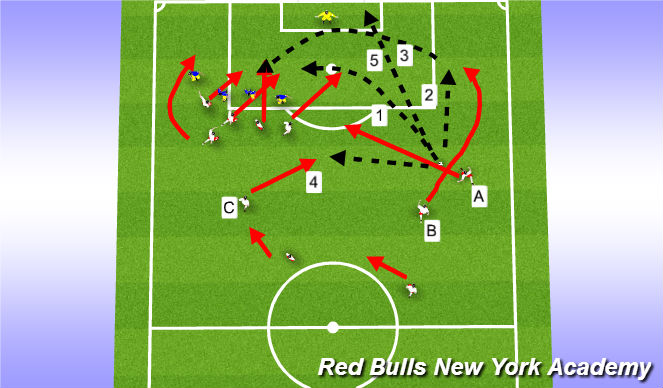
Organization: PLAY QUICKLY. CATCH the Oppostion with their backs turned. In the Attacking half look to get in begind the Midfield and Defenders. Midfield look to switch fields and Def half look to switch fields and play out the other side.
Instructions:Play Quickly
A: (attacking half): #9 comes into the Corner play ball in behind
B: #7 or #11 comes to support and rebounds to #2 or #3 to play into the #9, #10 or #11
C: Defensive third - look to switch point of attack and play out the other side.
Coaching Points: Communicate and be first to the ball.
Progressions:
See the guidance at the top of this page to understand why you are not seeing interactive Football/Soccer images.

4 & 2 CK
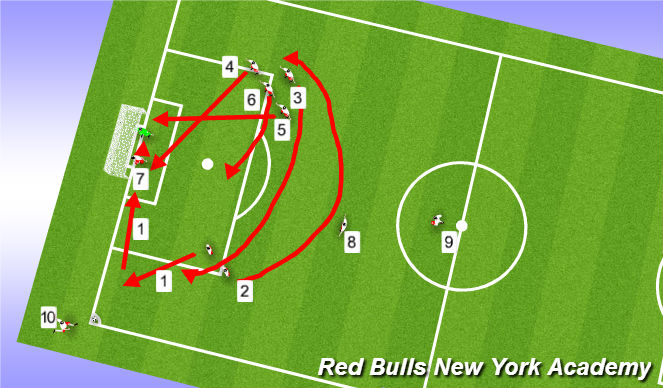
Organization: Players 1 and 2 at edge of PA nearest to the ball. Players 3,4,5,6 stacked at Rear Edge of PA (3 in front and 1 hidden behind) # 7 on the keeper.
Instructions:
#1 breaks for "Short Corner" and then doubles back to near post (ask for the ball visually and verbally)
#2 and #3 swap positions and bend their runs (#2 is the main target to put ball back into the area on a long ball)
#4 makes near post run (perfect if there is no one on the near post)
#5 Makes back post run
#6 Makes the trailing run between 12' and 18'
#7 marks the keeper
#8 and #9 Responsible for marking opponents and putting second ball back into the box
#10 takes the corner (raises hand to signal start to sequence)
Coaching Points:
Communication and synchronization make this a very powerful Corner routine. Together we cover every potential danger area in the box and no spot is neglected. This can be used every time and offers 7 different possibilities on short, long, driven or clipped service into the box.
See the guidance at the top of this page to understand why you are not seeing interactive Football/Soccer images.

Free Kicks
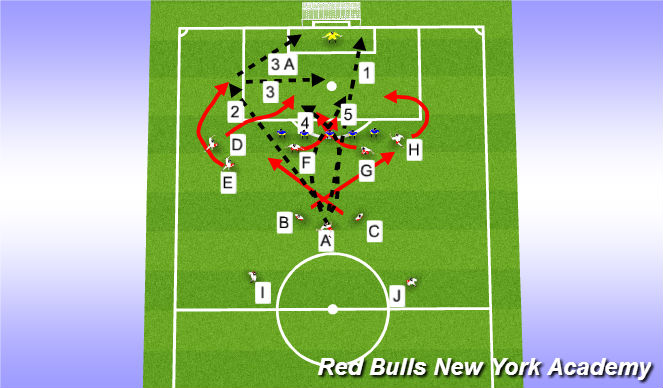
Organization: Attacking Set Piece (same from either side 40' yards from goal and closer.
Instructions:
5 players on the edge of the 18" Attacking runs into the Box
2 players over the ball (Bent Ball delivery between 6' and 12' area.
2 players over the ball (B makes dummy run into the wing (option 2) players outswinging cross to runners in the 6' to 12' area.
Player A plays a cut ball to player C ( who shoots or chips ball over defenders)
Player A shoots directly at goal - we attack second ball.
Coaching Points:
Aggressive on the ball.
FREE KICKS IN OUR HALF: Put the ball down and play Quickly - Switch Point of Attack, keep Possession and look to penetrate weak side gaps.
See the guidance at the top of this page to understand why you are not seeing interactive Football/Soccer images.

FK-Straight on
Organization: Direct Free Kick
A,B,C over the Ball D&E top of box to the left or Right of wall
F,G,H on the wall
I and J offer defensive cover and support for second ball
Instructions:
B and C run over the ball to penetrate either side of the wall
D Makes run behind wall
E makes bent run to receive clipped pass to redirect at goal or across the back of the wall (headed down to feet of runners coming into the box)
F anf G makes runs through the wall swapping positions
H makes bent run around the wall to receive from E
A shoots, chips or clips ball to most dangerous option
Coaching Points:
Massive effort to confuse and distract opposition and to get on the ball first. Must happen very quickly.


 Play animation
 Play step-by-step
 Repeat (toggle)
 Full Screen
 Pause
Pause Stop
Stop
Inverted Triangle in Midfield - Playing with a #6
#6 refers to a single holding midfielder that plays in front of the back line.
The #6 needs positional discipline and awareness. This players acts as a link between the back four and the two center-mids. (8 & 10)
The #6 looks to tuck in between the center-backs in transition, especially when one of the fullbacks has pushed up. This player distributes the ball from deep positions and is often referred to as a box-to-box player.