


Football/Soccer Session (Difficult): 4231 defending shape principles
Profile Summary

| Name: | Nathan Mason |
|---|---|
| City: | Columbia |
| Country: | United States of America |
| Membership: | Adult Member |
| Sport: | Football/Soccer |
See the guidance at the top of this page to understand why you are not seeing interactive Football/Soccer images.
See the guidance at the top of this page to understand why you are not seeing interactive Football/Soccer images.
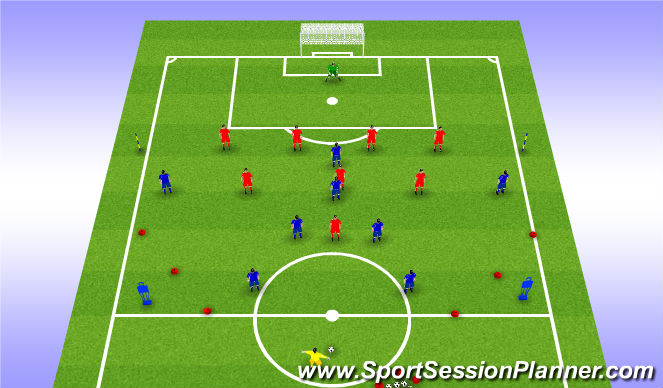
SSG
Defending Principles
Protect The Middle / Force Wide / Defend the Cross / Body On Line / Protect space between units / Prevent Split passes (members of a unit closer together).
Organisation
Area size of 40 by 40.
Blues (In Possession) set up in a 4-2-3-1 formation (with full backs not involved).
Reds (Out of Possession) set up in a 4-3-3 formation (with wide forward players not involved).
Sets of Balls in either Goals, ready to resume play.
Poles either side of pitch indicating Defensive Line starting position for out of possession team.
9vs9
Targets
For Blues to create chances in the final third through Width & Depth and Zone 14, using good combinations, quick movement of the ball, off the ball movement and quality of pass.
For the Reds to nullify these threats and stop the Blues creating chances by protecting the middle, forcing play wide and stopping crosses.
Conditions
Reds must restart every wave by assuming their defensive line (indicated by Poles).
GKs must pass ball rather than go route one.
Reds have 10 seconds to get the ball forward to the no.9
Challenges
Can we defend an overload in wide areas?
- What if Blues' no.10 and one Deep Lying Midfielder stretch the pitch by moving wide to join the winger, creating a 3 vs 1 in wide areas. Wide Midfielder presses the ball, whilst Full Back moves out to cover widest player, (Goal side, showing them down the wing and away from goal). Ball side Centre Half moves to edge of 18yard box to cover Blues no.10, whilst Central Midfielder drops to cover space in between Centre Backs (in line with 18 yard box) and the other Centre Back moves across, in line with the penalty spot, ensuring that the ball into the Striker is cut off. Full back and furthest Wide Midfielder move across in line with their units and in line with the edge of the 6 yard box. Minimising space between units. If the ball comes back out and the Blues attempt a switch, the same movement applies to the other wing.
Can we defend a ball over the top?
- What if the Blues look to break lines by playing the ball over the top? Defensive Unit drops to just above the penalty spot (with full backs the width of the 18yard box). Midfield unit drops to the edge of the 18yard box, with wide midfielders tucked in to just inside the width of the 18yard box, ensuring the Blues' No.10 is covered, whilst the Centre Backs ensure there is little room between them (both just inside the width of the 6yard box). Full backs able to pick up clearances wide by being wide.
Defending from the front
- 5vs1 - What's the trigger for the Striker to press the ball? Goalkeeper plays the ball into one of the Centre Backs. As soon as the ball is played to the Centre Back this acts as the trigger for the Striker to press the ball. If the ball is then played to the opposite Centre Back, the Striker stays with the other Centre Back (recover). Reds' ball side wide midfielder presses the ball, showing the ball down the line (on the outside). The ball-side Full Back moves to get close to the Winger, whilst the Red ball-side Centre Back moves in line with the edge of the six yard box, in line with the other Centre Back, who moves across to to be in line with the penalty spot. The Central Midfielder drops inbetween the Centre Backs (just outside the D), far side Full-Back tucks in (in line with 6 yard box), whilst far sided wide Midfielder occupies space in between the Centre Half and Full Back (in line with Central Midfielder).
'%3E%3Cpath id='path4169' d='M 11.4375,70.25 C 11.457031,38.394531 37.277344,13.242188 68.253906,13.050781 99.78125,12.855469 125.73047,38.351563 125.8125,70.078125 125.89844,101.62109 100.43359,127.14063 69.148438,127.42188 37.582031,127.70703 11.464844,102.23438 11.4375,70.25 m 6.425781,-0.08984 c 0.03516,28.421871 23.027344,50.69922 50.519532,50.82031 C 96.433594,121.10156 119.30469,98.367188 119.38281,70.359375 119.45313,42.878906 97.382813,19.714844 69.015625,19.496094 40.75,19.277344 17.964844,42.035156 17.863281,70.160156' style='clip-rule:nonzero;fill:%23333f48;fill-opacity:1;fill-rule:nonzero;stroke:none' /%3E%3Cpath style='fill:%23333f48;fill-opacity:1;fill-rule:nonzero;stroke:none' d='m 39.789063,108.62109 c 0.28125,0.14454 0.550781,0.32032 0.839843,0.4336 2.734375,1.05469 5.554688,1.78125 8.453125,2.23047 2.734375,0.42578 5.484375,0.64453 8.25,0.54297 3.988282,-0.15625 7.832032,-0.94922 11.445313,-2.69532 1.683594,-0.8164 3.246094,-1.82422 4.640625,-3.07422 3.265625,-2.92578 5.171875,-6.582027 5.796875,-10.906246 0.546875,-3.761719 0.04687,-7.425781 -1.09375,-11.019531 -1.4375,-4.523438 -3.730469,-8.582032 -6.703125,-12.265625 -1.03125,-1.277344 -2.082031,-2.535157 -3.113281,-3.808594 C 66.789063,66.1875 65.332031,64.269531 64.0625,62.21875 c -1.601562,-2.582031 -2.835937,-5.316406 -3.613281,-8.261719 -0.683594,-2.574218 -0.902344,-5.1875 -0.6875,-7.828125 0.214844,-2.617187 0.910156,-5.117187 2.152344,-7.441406 2.164062,-4.050781 5.503906,-6.710937 9.816406,-8.179687 1.890625,-0.640625 3.835937,-1.058594 5.832031,-1.195313 1.121094,-0.07813 2.242188,-0.152344 3.363281,-0.164062 4.28125,-0.02734 8.4375,0.734375 12.453125,2.175781 1.871094,0.671875 3.6875,1.496094 5.523438,2.257812 0.226562,0.09375 0.4375,0.230469 0.664062,0.351563 -0.164062,0.25 -0.371093,0.160156 -0.539062,0.164062 -2.824219,0.101563 -5.535156,0.703125 -8.132813,1.804688 -1.335937,0.570312 -2.570312,1.316406 -3.648437,2.296875 -2.527344,2.296875 -3.605469,5.15625 -3.34375,8.550781 0.140625,1.855469 0.722656,3.574219 1.550781,5.222656 0.648438,1.296875 1.414063,2.523438 2.292969,3.675782 0.953125,1.25 1.929687,2.484375 2.929687,3.699218 2.085938,2.523438 4.164063,5.054688 6.050782,7.738282 2.203125,3.136718 4.140627,6.417968 5.589847,9.980468 1.16406,2.867188 2.01562,5.820313 2.39843,8.894532 0.25,2.011718 0.30079,4.03125 0.11719,6.058593 -0.24219,2.640625 -0.79297,5.195313 -1.74609,7.667969 -1.29688,3.36328 -3.300784,6.22656 -5.972659,8.63281 -2.429687,2.19141 -5.171875,3.90625 -8.109375,5.3125 -2.695312,1.29297 -5.464843,2.40235 -8.34375,3.20313 -1.953125,0.54687 -3.945312,0.8789 -5.949218,1.15625 -3.035157,0.41797 -6.085938,0.48828 -9.132813,0.3125 -5.328125,-0.3125 -10.476562,-1.46094 -15.410156,-3.52344 -3.449219,-1.44141 -6.691406,-3.25781 -9.757813,-5.39453 -0.183593,-0.12891 -0.378906,-0.25 -0.53125,-0.41016 -0.07031,-0.0703 -0.05859,-0.22656 -0.08203,-0.34375 z m 0,0' id='path4175' /%3E%3Cpath style='fill:%23333f48;fill-opacity:1;fill-rule:nonzero;stroke:none' d='M 94.699219,29.390625 C 94.089844,29.21875 93.476563,29.054688 92.867188,28.875 90.183594,28.085938 87.46875,27.441406 84.703125,27.046875 c -3.976562,-0.566406 -7.945312,-0.59375 -11.863281,0.402344 -7.535156,1.914062 -12.386719,6.71875 -14.878906,13.996094 -0.894532,2.617187 -1.179688,5.328125 -0.953125,8.078125 0.203125,2.484375 0.867187,4.859375 1.816406,7.160156 0.933594,2.261719 2.117187,4.390625 3.4375,6.449219 1.4375,2.25 3.050781,4.371093 4.640625,6.511718 1.4375,1.933594 2.867187,3.871094 4.261719,5.835938 1.230468,1.730469 2.316406,3.546875 3.273437,5.445312 1.324219,2.625 2.265625,5.378907 2.703125,8.292969 0.433594,2.902344 0.292969,5.765625 -0.660156,8.5625 -0.9375,2.74609 -2.574219,5.00781 -4.777344,6.875 -2.417969,2.04688 -5.203125,3.39844 -8.246094,4.22266 -1.835937,0.5 -3.703125,0.75781 -5.609375,0.82031 -3.886718,0.13281 -7.679687,-0.47266 -11.421875,-1.46094 -2.261718,-0.59765 -4.488281,-1.33203 -6.695312,-2.11328 -0.207031,-0.0742 -0.40625,-0.16797 -0.597656,-0.25 -0.02344,-0.24609 0.148437,-0.19141 0.25,-0.20703 1.96875,-0.30469 3.921875,-0.67969 5.804687,-1.34766 1.367188,-0.48437 2.671875,-1.10156 3.855469,-1.94922 2.25,-1.61328 3.65625,-3.765621 4.0625,-6.515621 0.273437,-1.867188 0.09375,-3.710938 -0.429688,-5.527344 -0.472656,-1.648437 -1.171875,-3.199219 -2.109375,-4.628906 -0.792968,-1.207031 -1.636718,-2.382813 -2.523437,-3.519531 -0.921875,-1.195313 -1.921875,-2.328125 -2.890625,-3.484375 -2.753906,-3.273438 -5.351563,-6.660157 -7.523438,-10.355469 -2.042968,-3.480469 -3.667968,-7.136719 -4.597656,-11.078125 -0.640625,-2.699219 -0.980469,-5.4375 -0.832031,-8.214844 0.238281,-4.53125 1.476562,-8.78125 3.824219,-12.6875 1.082031,-1.800781 2.445312,-3.375 3.988281,-4.800781 2.742187,-2.527344 5.863281,-4.480469 9.257812,-5.992188 3.746094,-1.667968 7.652344,-2.769531 11.707032,-3.394531 3.152343,-0.488281 6.324218,-0.671875 9.507812,-0.519531 8.632813,0.410156 16.671875,2.792969 24,7.433594 0.08203,0.05078 0.152344,0.109375 0.230469,0.167968 -0.0039,0.04297 -0.0078,0.08984 -0.01563,0.136719' id='path4177' /%3E%3Cpath style='fill:%23333f48;fill-opacity:1;fill-rule:nonzero;stroke:none' d='m 31.699219,38.75 c -0.07813,0.238281 -0.152344,0.476563 -0.238281,0.710938 -1.460938,4.074218 -2.066407,8.28125 -1.808594,12.59375 0.4375,7.304687 2.808594,13.925781 7.277344,19.753906 3.714843,4.84375 7.441406,9.671875 11.167968,14.503906 1.113282,1.441406 1.953125,3.007813 2.414063,4.777344 0.332031,1.257812 0.425781,2.539062 0.273437,3.820312 -0.214843,1.832032 -1.070312,3.34375 -2.464843,4.546875 -0.984375,0.851559 -2.113282,1.449219 -3.316407,1.925779 -1.378906,0.54297 -2.8125,0.89063 -4.273437,1.1211 -2.226563,0.35547 -4.46875,0.46093 -6.722656,0.41015 -0.589844,-0.0156 -1.046875,-0.18359 -1.433594,-0.625 -0.636719,-0.72265 -1.335938,-1.39062 -1.9375,-2.14062 C 25.574219,93.800781 22.300781,86.621094 20.84375,78.636719 20.152344,74.835938 19.917969,71 20.15625,67.128906 20.796875,56.773438 24.390625,47.574219 30.859375,39.480469 c 0.21875,-0.273438 0.453125,-0.53125 0.679688,-0.796875 0.05469,0.02344 0.109375,0.04297 0.160156,0.06641' id='path4179' /%3E%3Cpath style='fill:%23333f48;fill-opacity:1;fill-rule:nonzero;stroke:none' d='m 105.41016,101.30078 c -0.13282,-0.3125 0.0234,-0.5039 0.0977,-0.69922 1.38672,-3.749997 1.98047,-7.628904 1.89844,-11.621091 -0.14453,-6.84375 -2.08594,-13.144531 -5.73437,-18.925781 C 99.890625,67.226563 97.917969,64.53125 95.835938,61.917969 94.4375,60.160156 92.988281,58.4375 91.582031,56.6875 90.632813,55.511719 89.6875,54.335938 88.792969,53.121094 c -0.835938,-1.144531 -1.488281,-2.398438 -1.953125,-3.742188 -0.523438,-1.515625 -0.695313,-3.070312 -0.511719,-4.652343 0.21875,-1.839844 1.082031,-3.339844 2.476563,-4.542969 1.039062,-0.890625 2.230468,-1.507813 3.503906,-1.980469 1.632812,-0.609375 3.320312,-0.960937 5.046875,-1.175781 1.917969,-0.238281 3.839841,-0.269531 5.769531,-0.230469 0.52734,0.01172 0.89453,0.203125 1.23828,0.585938 5.50391,6.113281 9.26172,13.144531 11.21875,21.132812 1.11719,4.554688 1.5625,9.179688 1.30469,13.855469 -0.58203,10.625 -4.23438,20.082031 -10.96094,28.339846 -0.15625,0.1914 -0.32812,0.375 -0.51562,0.58984' id='path4181' /%3E%3Cpath style='fill:%23333f48;fill-opacity:1;fill-rule:nonzero;stroke:none' d='m 39.796875,108.63281 c -0.05859,0.0117 -0.117187,0.0234 -0.175781,0.0352 0.05469,-0.0156 0.113281,-0.0312 0.167969,-0.0469 z m 0,0' id='path4183' /%3E%3C/g%3E%3C/svg%3E)

 Play animation
 Play step-by-step
 Repeat (toggle)
 Full Screen
 Pause
Pause Stop
Stop
Specific Practice
Defending Principles
Protect The Middle / Force Wide / Defend the Cross / Body On Line / Protect space between units / Prevent Split passes (members of a unit closer together).
Organisation
Area size of 40 by 40.
Blues (In Possession) set up in a 4-2-3-1 formation (with full backs not involved).
Reds (Out of Possession) set up in a 4-3-3 formation (with wide forward players not involved).
Cones on either side of pitch bringing the wing in with mannequins placed as targets for out of possession to score points from (equivalent of launching a counter attack wide).
Balls set up in a coned area near Blues' GK to serve.
9vs9
Targets
For Blues to create chances in the final third through Width & Depth and Zone 14, using good combinations, quick movement of the ball, off the ball movement and quality of pass.
For the Reds to nullify these threats and stop the Blues creating chances by protecting the middle, forcing play wide and stopping crosses.
Conditions
Blues start with the ball always. Reds Defensive line ALWAYS must be in line with poles either side of the pitch at the restart.
Reds cannot press until the first pass has been made (from GK)
Reds score points by winning the ball back and passing into the mannequin (to launch counter attack).
Challenges
Can we stop crosses coming in from wide areas?
- What if the ball goes into the winger, who looks to take the full back on? Full-back shows winger down the wing (away from Goal), with the other three defenders in the unit coming across (CB nearest the defending full back closes to just in line with the 6yard box, other CB in line with the penalty spot, furthest full-back in line with 6yard box. Midfield Unit drops too. Wide midfielder looks to cut the space between opposition winger and striker, Central Midfielder drops to split in line with Centre Backs, whilst furthest Wide Midfielder drops in line with Central Midfielder and Full Back - Minimising space between units and protecting the middle).
Can we stop the Ball being played through the middle?
- What if one Deep Lying Midfielder moves into the final third creating options and a central overload (4vs3 on either side) as soon as the other Deep Midfielder gets the ball (Red Striker bypassed). Reds need the Central Midfielder to drop in line with ball side Centre Back (in line with 6yard box), furthest Wide Midfielder drops (in line with edge of 6yard box) to ensure the pass through to Blues' 10 is covered and ball side Wide Midfielder tucks in (in line with 18 yard box), cutting off the passing lane to the Winger, eho remains marked by the Full Back. Rotating Deep Lying screened by ball side Centre Half (in line with 6yard box) and the two Midfielders in close proximity to the ball. Opposition's furthers Winger is left alone, as Reds' furthest full back tucks in to the edge of the 18yard box, to ensure any attempt at a splitting pass through the unit is covered.
Time Challenges
Reds have 20 seconds to win the ball back and get the ball out to the mannequin.