


Football/Soccer Session (Moderate): Formation and Shape
Profile Summary

| Name: | Mikael Ndombasi |
|---|---|
| City: | Sydney |
| Country: | Australia |
| Membership: | Adult Member |
| Sport: | Football/Soccer |
Description
Description of team system, principles and tactics.

See the guidance at the top of this page to understand why you are not seeing interactive Football/Soccer images.

See the guidance at the top of this page to understand why you are not seeing interactive Football/Soccer images.
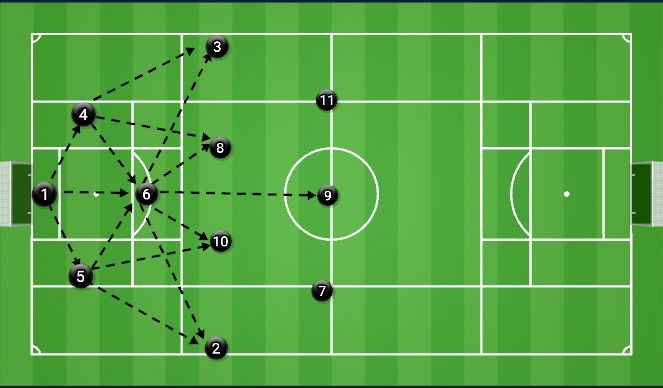
Correct Spacing
Spacing in a 4-3-3 (We are in black)
Grid above provides the best possible spacing in a 433 as we start to get on the ball.
Key coaching points:
1. Spacing: Ensure each zone has at least two players for support. Maintain a maximum distance of 30m between players (don't be too distant)
2. Width: Wingers tuck in next to striker when the ball is on the opposite side, but open up to create space when it switches.
3. Follow the 3+1 theory: ball carrier should always have two support options and one making a forward run.
See the guidance at the top of this page to understand why you are not seeing interactive Football/Soccer images.
Playing out from the back
Playing out from the back
The view above provides a guideline to our shape when we are playing out the back. We have multiple defenders and CDMs (6) who are comfortable on the ball.
Coaching points:
1. Options: In this shape, every ball carrier should have 3 options for a pass as per the arrows above.
2. Fullbacks: Key that fullbacks get high and wide to provide out ball
3. No risks: If in doubt or press from opposition is full, go direct into 11, 9 or 7.

See the guidance at the top of this page to understand why you are not seeing interactive Football/Soccer images.
Possession on the ball
The view above provides a guideline to our shape when we are in possession of the ball in the attacking half. We should be aiming to be in a 2-3-2-3 formation.
Key coaching points:
1. Role of the 6: Ensure the number 6 stays behind the ball at all times, shielding the defence, covering gaps left by attacking fullbacks, and providing a reset option if needed.
2. Staggered Defence: Fullbacks should position themselves slightly ahead of the centre backs to intercept balls within their zones. This ensures they can quickly transition into attacking play.
3. Centre Backs' Responsibility: Centre backs are responsible for covering runs over the top on either side, providing a safety net against through balls and counterattacks.
4. Goalkeeper's Role: The goalkeeper should be prepared to sweep long balls played over the top, acting as a sweeper keeper to nullify any potential threats behind the defence.
5. Wingers: Get narrow when the ball is on opposing side to penetrate or find back post.
6. Striker: Look to test back line (in behind) and hold the ball up to buy the team time to provide support.
See the guidance at the top of this page to understand why you are not seeing interactive Football/Soccer images.
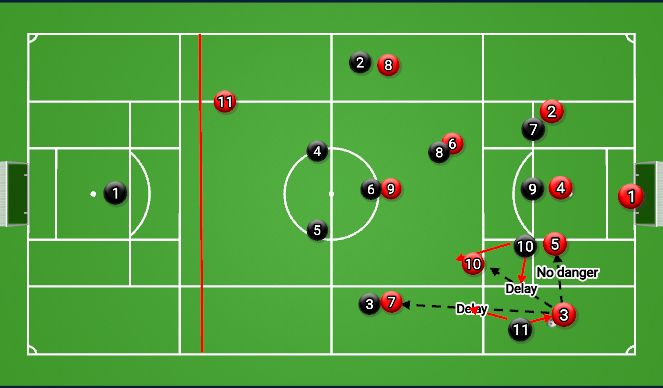
Transition to off ball
This view shows how we transition from our attacking shape (we are in black) into our defence shape. We should end up in a 4-5-1.
Coaching points:
Recover into position like your life depends on it, our speed of recovery into defensive shape is key.
Once the ball is lost (DEFENSIVE TRANSITION), our aim should be:
1. DELAY: The 1 or 2 players closest to the opponent on the ball should look to DELAY the opponent by cutting off their next passing lane or delaying the man directly by jockeying.
2. COMPACT: The 4 defenders should now occupy the central zone with the midfield compact, forcing the opponent wide where we'll look to delay, double up (either CDM or winger) in order to regain the ball in non-dangerous areas and get back into attack.
3. Man marking or passing lane: Off the ball, players should always be either within touching distance of their man or in a position to block a pass to their man.
4. Defensive line: The defence should hold roughly a mid-depth line between the edge of the box and halfway line to ensure the team stays connected and we don't fall too deep and become at risk of balls in the box or go to high and be susceptible to long balls (see red line on field)
Animations: 1) first animation shows us losing the ball and the passing lanes that we need to cut off (black arrows) to DELAY the opposition and the passing lane that does not contain any danger to us. 2) the second animation shows the play progressing a few passes later, and the defensive shape we should be in off the ball.
See the guidance at the top of this page to understand why you are not seeing interactive Football/Soccer images.
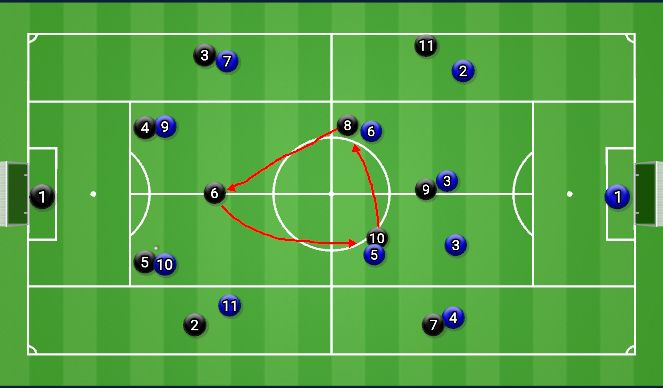
Midfield Rotation
In a 433 the rotation between the 3 midfield players is critical to 1) offering great forward passing options for your team mates 2) making it difficult for the opposition to stay in their midfield shape due to non-stop movement
Key rules to midfield rotation:
1. Always look to stay in a triangle within your midfield 3
2. Aim to always have one of the three running between the opposition midfield and defence 'breaking the lines' - to offer that forward pass
3. Aim to always have one sitting in front of the defence to offer cover and shield - if the 6 or CDM checks out wide to offer a passing option, a fellow midfielder should fill in
4. Try to never be on the same line as (horizontal and vertical) as your fellow central midfielders, makes it easier to pick you up and block passing lines
EXAMPLE ANIMATION.

See the guidance at the top of this page to understand why you are not seeing interactive Football/Soccer images.
Attacking pattern 1: Wing Play
Attacking Pattern 1: Cross into middle
Movement - red arrows
Passing - black arrows
Our first variation has the CDM playing a direct ball into the ST who holds the ball up until there is support either at LCM or RCM. Ball is then touched back to LCM or RCM and progressed down the wing either on the ground or over the top.
ST > front post
One of LCM or RCM > penalty spot
Other Winger > backpost
Coaching points:
- Timing of movement is key
- Midfielders continuing their runs into the box
- Knowing to restart pattern (see pattern two) when the wing play is not on
- Looking to play in behind opponent

See the guidance at the top of this page to understand why you are not seeing interactive Football/Soccer images.
Attacking pattern 2: Wing Switch
Attacking Pattern 2: Switch of play
Movement - red arrows
Passing - black arrows
Our second variation has the CDM (could also be CM) playing a direct ball out wide. The winger and ST do not have forward options so play the ball back into LCM or RCM to switch to the other winger who should now be trying to stretch the opposing wing for either a cross from the byline or from deep depending on numbers in the box.
Coaching points:
- Timing of movement is key
- Midfielders continuing their runs to edge of box
- Knowing to restart pattern (see pattern three) when the wing play is not on
- Looking to play in behind opponent
- Opposing winger stretching play
See the guidance at the top of this page to understand why you are not seeing interactive Football/Soccer images.
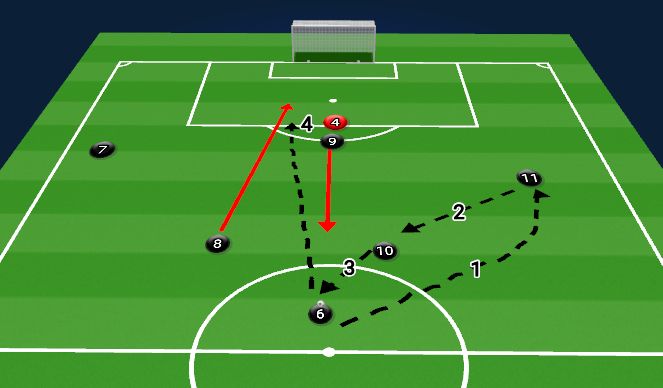
Attacking Pattern 3: Third person run
Attacking Pattern 3: Third person run from midfield
Movement - red arrows
Passing - black arrows
Our third variation occurs when there is no wing play or switch available due to wingers and LCM/RCM being closely marked. Instead we become patient and the ball is returned to a CDM or a CM with either the LCM or RCM making a third person run into the box to receive a direct ball through the opponent defence.
Coaching points:
- Timing of movement is key - especially number 9 bringing defenders forward to open space
- Either LCM OR RCM (not both) continuing run into box, timing it off the strikers movement.
- Looking to play in behind opponent
- Opposing winger stretching play to create space
See the guidance at the top of this page to understand why you are not seeing interactive Football/Soccer images.
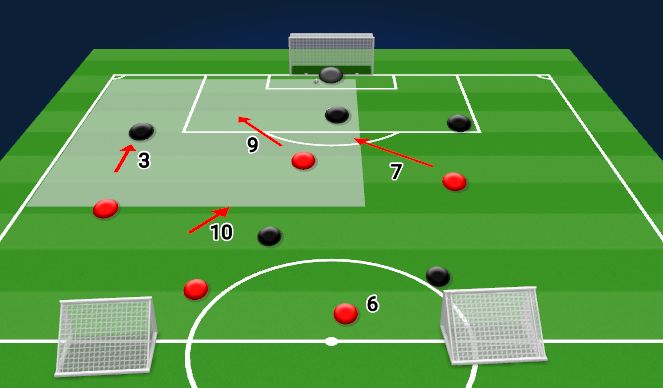
Pressing in the final third (30 mins)
Pressing in the final third
Key note: We are not yet a pressing team. Refer to Transition to off ball for how we play off the ball.
But there are occasions when we can press - the call to press is always from the CM or CDM, no other position.
Aim of our press:
- Trap the defending team on one side by splitting the field in half and forcing them back inside where we have the overload
When to press?
Trigger to press: PRIMARY: Ball is passed out wide to fullback on either side
SECONDARY: Bad/under hit/difficult to control pass, defender going backwards, CDM/CM call for a press
How to press?
Commitment & communication - All must press OR drop together to have success. Remember our starting philosophy is to delay and get into our shape - only press when set.
'Creating the box':
#3 - Nearest player pressures the ball. Slows down/delays the attacker, shows inside
#10 & #9 - Provide cover, double up for the dribble, positioning to intercept/block a pass.
#9 - Takes away the option of a pass to centreback, 'cuts field in half'
#7 - Tucks in to provide balance & 'weak side' support
#6 - Acts as a screen to intercept/block a longer pass and secondary cover if needed
'%3E%3Cpath id='path4169' d='M 11.4375,70.25 C 11.457031,38.394531 37.277344,13.242188 68.253906,13.050781 99.78125,12.855469 125.73047,38.351563 125.8125,70.078125 125.89844,101.62109 100.43359,127.14063 69.148438,127.42188 37.582031,127.70703 11.464844,102.23438 11.4375,70.25 m 6.425781,-0.08984 c 0.03516,28.421871 23.027344,50.69922 50.519532,50.82031 C 96.433594,121.10156 119.30469,98.367188 119.38281,70.359375 119.45313,42.878906 97.382813,19.714844 69.015625,19.496094 40.75,19.277344 17.964844,42.035156 17.863281,70.160156' style='clip-rule:nonzero;fill:%23333f48;fill-opacity:1;fill-rule:nonzero;stroke:none' /%3E%3Cpath style='fill:%23333f48;fill-opacity:1;fill-rule:nonzero;stroke:none' d='m 39.789063,108.62109 c 0.28125,0.14454 0.550781,0.32032 0.839843,0.4336 2.734375,1.05469 5.554688,1.78125 8.453125,2.23047 2.734375,0.42578 5.484375,0.64453 8.25,0.54297 3.988282,-0.15625 7.832032,-0.94922 11.445313,-2.69532 1.683594,-0.8164 3.246094,-1.82422 4.640625,-3.07422 3.265625,-2.92578 5.171875,-6.582027 5.796875,-10.906246 0.546875,-3.761719 0.04687,-7.425781 -1.09375,-11.019531 -1.4375,-4.523438 -3.730469,-8.582032 -6.703125,-12.265625 -1.03125,-1.277344 -2.082031,-2.535157 -3.113281,-3.808594 C 66.789063,66.1875 65.332031,64.269531 64.0625,62.21875 c -1.601562,-2.582031 -2.835937,-5.316406 -3.613281,-8.261719 -0.683594,-2.574218 -0.902344,-5.1875 -0.6875,-7.828125 0.214844,-2.617187 0.910156,-5.117187 2.152344,-7.441406 2.164062,-4.050781 5.503906,-6.710937 9.816406,-8.179687 1.890625,-0.640625 3.835937,-1.058594 5.832031,-1.195313 1.121094,-0.07813 2.242188,-0.152344 3.363281,-0.164062 4.28125,-0.02734 8.4375,0.734375 12.453125,2.175781 1.871094,0.671875 3.6875,1.496094 5.523438,2.257812 0.226562,0.09375 0.4375,0.230469 0.664062,0.351563 -0.164062,0.25 -0.371093,0.160156 -0.539062,0.164062 -2.824219,0.101563 -5.535156,0.703125 -8.132813,1.804688 -1.335937,0.570312 -2.570312,1.316406 -3.648437,2.296875 -2.527344,2.296875 -3.605469,5.15625 -3.34375,8.550781 0.140625,1.855469 0.722656,3.574219 1.550781,5.222656 0.648438,1.296875 1.414063,2.523438 2.292969,3.675782 0.953125,1.25 1.929687,2.484375 2.929687,3.699218 2.085938,2.523438 4.164063,5.054688 6.050782,7.738282 2.203125,3.136718 4.140627,6.417968 5.589847,9.980468 1.16406,2.867188 2.01562,5.820313 2.39843,8.894532 0.25,2.011718 0.30079,4.03125 0.11719,6.058593 -0.24219,2.640625 -0.79297,5.195313 -1.74609,7.667969 -1.29688,3.36328 -3.300784,6.22656 -5.972659,8.63281 -2.429687,2.19141 -5.171875,3.90625 -8.109375,5.3125 -2.695312,1.29297 -5.464843,2.40235 -8.34375,3.20313 -1.953125,0.54687 -3.945312,0.8789 -5.949218,1.15625 -3.035157,0.41797 -6.085938,0.48828 -9.132813,0.3125 -5.328125,-0.3125 -10.476562,-1.46094 -15.410156,-3.52344 -3.449219,-1.44141 -6.691406,-3.25781 -9.757813,-5.39453 -0.183593,-0.12891 -0.378906,-0.25 -0.53125,-0.41016 -0.07031,-0.0703 -0.05859,-0.22656 -0.08203,-0.34375 z m 0,0' id='path4175' /%3E%3Cpath style='fill:%23333f48;fill-opacity:1;fill-rule:nonzero;stroke:none' d='M 94.699219,29.390625 C 94.089844,29.21875 93.476563,29.054688 92.867188,28.875 90.183594,28.085938 87.46875,27.441406 84.703125,27.046875 c -3.976562,-0.566406 -7.945312,-0.59375 -11.863281,0.402344 -7.535156,1.914062 -12.386719,6.71875 -14.878906,13.996094 -0.894532,2.617187 -1.179688,5.328125 -0.953125,8.078125 0.203125,2.484375 0.867187,4.859375 1.816406,7.160156 0.933594,2.261719 2.117187,4.390625 3.4375,6.449219 1.4375,2.25 3.050781,4.371093 4.640625,6.511718 1.4375,1.933594 2.867187,3.871094 4.261719,5.835938 1.230468,1.730469 2.316406,3.546875 3.273437,5.445312 1.324219,2.625 2.265625,5.378907 2.703125,8.292969 0.433594,2.902344 0.292969,5.765625 -0.660156,8.5625 -0.9375,2.74609 -2.574219,5.00781 -4.777344,6.875 -2.417969,2.04688 -5.203125,3.39844 -8.246094,4.22266 -1.835937,0.5 -3.703125,0.75781 -5.609375,0.82031 -3.886718,0.13281 -7.679687,-0.47266 -11.421875,-1.46094 -2.261718,-0.59765 -4.488281,-1.33203 -6.695312,-2.11328 -0.207031,-0.0742 -0.40625,-0.16797 -0.597656,-0.25 -0.02344,-0.24609 0.148437,-0.19141 0.25,-0.20703 1.96875,-0.30469 3.921875,-0.67969 5.804687,-1.34766 1.367188,-0.48437 2.671875,-1.10156 3.855469,-1.94922 2.25,-1.61328 3.65625,-3.765621 4.0625,-6.515621 0.273437,-1.867188 0.09375,-3.710938 -0.429688,-5.527344 -0.472656,-1.648437 -1.171875,-3.199219 -2.109375,-4.628906 -0.792968,-1.207031 -1.636718,-2.382813 -2.523437,-3.519531 -0.921875,-1.195313 -1.921875,-2.328125 -2.890625,-3.484375 -2.753906,-3.273438 -5.351563,-6.660157 -7.523438,-10.355469 -2.042968,-3.480469 -3.667968,-7.136719 -4.597656,-11.078125 -0.640625,-2.699219 -0.980469,-5.4375 -0.832031,-8.214844 0.238281,-4.53125 1.476562,-8.78125 3.824219,-12.6875 1.082031,-1.800781 2.445312,-3.375 3.988281,-4.800781 2.742187,-2.527344 5.863281,-4.480469 9.257812,-5.992188 3.746094,-1.667968 7.652344,-2.769531 11.707032,-3.394531 3.152343,-0.488281 6.324218,-0.671875 9.507812,-0.519531 8.632813,0.410156 16.671875,2.792969 24,7.433594 0.08203,0.05078 0.152344,0.109375 0.230469,0.167968 -0.0039,0.04297 -0.0078,0.08984 -0.01563,0.136719' id='path4177' /%3E%3Cpath style='fill:%23333f48;fill-opacity:1;fill-rule:nonzero;stroke:none' d='m 31.699219,38.75 c -0.07813,0.238281 -0.152344,0.476563 -0.238281,0.710938 -1.460938,4.074218 -2.066407,8.28125 -1.808594,12.59375 0.4375,7.304687 2.808594,13.925781 7.277344,19.753906 3.714843,4.84375 7.441406,9.671875 11.167968,14.503906 1.113282,1.441406 1.953125,3.007813 2.414063,4.777344 0.332031,1.257812 0.425781,2.539062 0.273437,3.820312 -0.214843,1.832032 -1.070312,3.34375 -2.464843,4.546875 -0.984375,0.851559 -2.113282,1.449219 -3.316407,1.925779 -1.378906,0.54297 -2.8125,0.89063 -4.273437,1.1211 -2.226563,0.35547 -4.46875,0.46093 -6.722656,0.41015 -0.589844,-0.0156 -1.046875,-0.18359 -1.433594,-0.625 -0.636719,-0.72265 -1.335938,-1.39062 -1.9375,-2.14062 C 25.574219,93.800781 22.300781,86.621094 20.84375,78.636719 20.152344,74.835938 19.917969,71 20.15625,67.128906 20.796875,56.773438 24.390625,47.574219 30.859375,39.480469 c 0.21875,-0.273438 0.453125,-0.53125 0.679688,-0.796875 0.05469,0.02344 0.109375,0.04297 0.160156,0.06641' id='path4179' /%3E%3Cpath style='fill:%23333f48;fill-opacity:1;fill-rule:nonzero;stroke:none' d='m 105.41016,101.30078 c -0.13282,-0.3125 0.0234,-0.5039 0.0977,-0.69922 1.38672,-3.749997 1.98047,-7.628904 1.89844,-11.621091 -0.14453,-6.84375 -2.08594,-13.144531 -5.73437,-18.925781 C 99.890625,67.226563 97.917969,64.53125 95.835938,61.917969 94.4375,60.160156 92.988281,58.4375 91.582031,56.6875 90.632813,55.511719 89.6875,54.335938 88.792969,53.121094 c -0.835938,-1.144531 -1.488281,-2.398438 -1.953125,-3.742188 -0.523438,-1.515625 -0.695313,-3.070312 -0.511719,-4.652343 0.21875,-1.839844 1.082031,-3.339844 2.476563,-4.542969 1.039062,-0.890625 2.230468,-1.507813 3.503906,-1.980469 1.632812,-0.609375 3.320312,-0.960937 5.046875,-1.175781 1.917969,-0.238281 3.839841,-0.269531 5.769531,-0.230469 0.52734,0.01172 0.89453,0.203125 1.23828,0.585938 5.50391,6.113281 9.26172,13.144531 11.21875,21.132812 1.11719,4.554688 1.5625,9.179688 1.30469,13.855469 -0.58203,10.625 -4.23438,20.082031 -10.96094,28.339846 -0.15625,0.1914 -0.32812,0.375 -0.51562,0.58984' id='path4181' /%3E%3Cpath style='fill:%23333f48;fill-opacity:1;fill-rule:nonzero;stroke:none' d='m 39.796875,108.63281 c -0.05859,0.0117 -0.117187,0.0234 -0.175781,0.0352 0.05469,-0.0156 0.113281,-0.0312 0.167969,-0.0469 z m 0,0' id='path4183' /%3E%3C/g%3E%3C/svg%3E)
 Play animation
 Play step-by-step
 Repeat (toggle)
 Full Screen
 Pause
Pause Stop
Stop
Screen 1
Non-Negotiables:
Enjoy Yourself: Mistakes happen, move onto the next play - it's not going to be on Sky Sports news. Support and communicate to each other through the game. Win or lose, it’s all about playing to our principles, building chemistry, and developing together as a team.
Social Time: One drink (minimum) at the social. Football’s not complete without some post-game beer/food.
Be On Time: Don’t be late.
System:
Principles:
On the Ball:
Off the Ball: