


Football/Soccer Session (Difficult): Unbalancing runs in the midfield U17+
Profile Summary

| Name: | Christopher Ruiz |
|---|---|
| City: | Lutz |
| Country: | United States of America |
| Membership: | Adult Member |
| Sport: | Football/Soccer |
Description
PRINCIPLES OF PLAY
• Diagonal passes to invite defenders to leave positions • Play inside-outside to create space in central zones
• Co-ordination of movements between midfielders and forward
PART 1: UNOPPOSED TECHNICAL WARM-UP
• This unopposed technical warm-up begins to lay the foundations of the tactical movements relating to unbalancing runs from midfielders.
• The practice requires eight players.
PART 2: 6+GK vs 6+GK +1 SMALL-SIDED GAME
• This small-sided game builds upon the unopposed technical warm-up, with conditions and rules set to bring out the concepts in a game situation.
• The practice sees a group of 15 players split into two teams of seven (each including a goalkeeper) plus one neutral player.
PART 3: 8+GK vs 8+GK +1 CONDITIONED GAME
• This conditioned game builds upon the previous practice, with similar conditions and scoring rules.
• The practice sees a group of 19 players split into two teams of nine (each including a goalkeeper) plus one neutral player
See the guidance at the top of this page to understand why you are not seeing interactive Football/Soccer images.
See the guidance at the top of this page to understand why you are not seeing interactive Football/Soccer images.
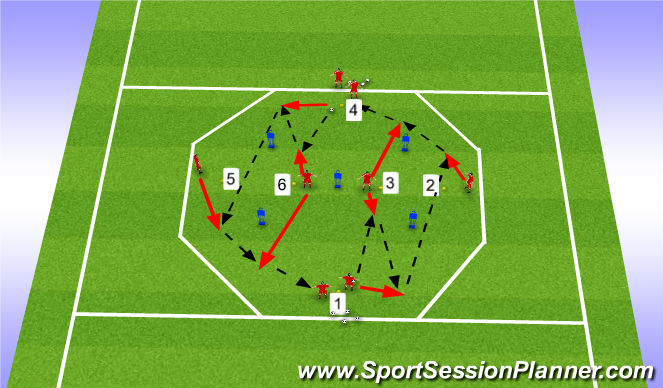
Warmup Pt2 passing pattern (10 mins)
FUNCTION 2
• Function 2 is a progression, beginning the tactical play with a third-man action (1-3) before the midfielders unbalance diagonally behind the defender to receive in behind the defensive line (4).
• Two balls will again be working, both beginning at the same time at Cone 1 and Cone 4.
• The whole sequence (1-5) illustrated above from Cone 1 should be replicated down the other side from
Cone 4. After a block of work, the same pattern can be repeated going in the opposite direction.
• The players rotate according to the numerical sequence denoted by the cones.
See the guidance at the top of this page to understand why you are not seeing interactive Football/Soccer images.
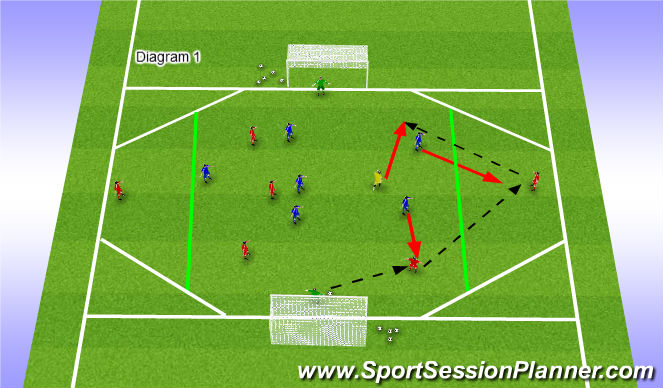
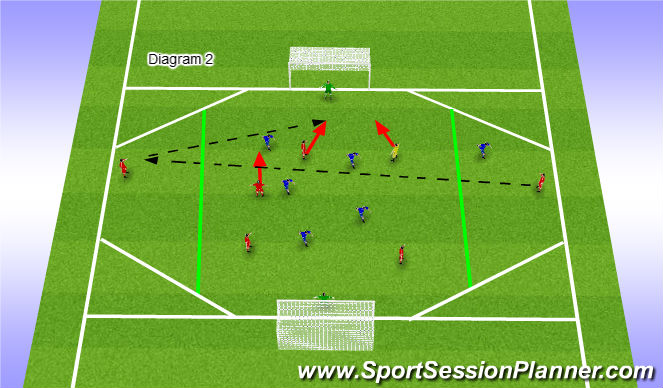
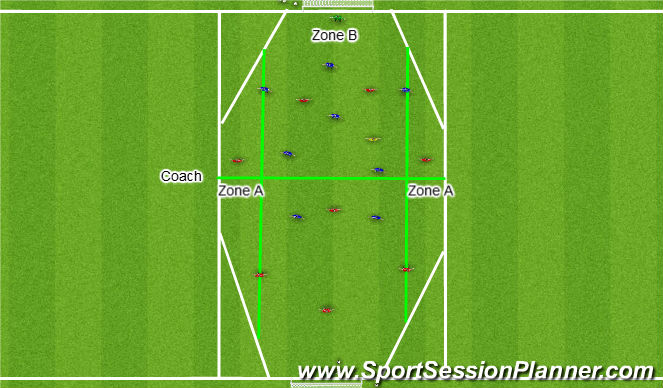
6v6 +GKs +1 D1 (20 mins)
FUNCTION
• This small-sided game is a conditioned practice based on the pitch boundaries. The pitch is in an octagon shape to encourage unbalancing runs from midfielders. The sidelines are marked by the full lines, and the offside rule will be in effect.
• The team in possession – here, Team A – will set up in a 1-2-3-1 formation. The neutral player (C) positions in the midfield line of three to create a 1-2-4-1 shape.
• The defending team – here, Team B – sets up in a 1-2-3-1 formation, with the two centre-backs controlling the height of the defensive line.
• There are three ways to score: 1) Scoring a normal goal
is worth 1 goal; 2) Playing a pass from Zone A into a runner behind the defensive line in Zone B (as in Diagram 1), from where they score within 2 touches, is worth 2 goals; 3) A direct switch in play from Zone A to Zone A, followed by a cross into Zone B within 2 touches (as in Diagram 2) and then scoring with 1 touch is worth 3 goals.
• If the ball goes out of bounds, a new ball will begin with the opposition goalkeeper. The neutral player then switches teams to maintain the midfield overload.
• If the team in possession scores, a new ball begins back with their goalkeeper.
COACHING DETAIL: IN POSSESSION
OFFENSIVE POSITIONING
• The team in possession should position in a 1-2-3-1 shape, with the wingers on both sides providing the width in Zone A.
• The midfielder should look to position between the lines, prioritising central positions and co-ordinating positioning with the neutral player; one to the left and one to the right in what becomes a 1-2-4-1 formation.
• The forward and centre-backs must provide the depth, prioritising central positions in Zone B. The forward should look to play on the back shoulder of the second centre-back.
2v1 IN BUILD-UP
• In order to work spatial advantages for the midfielders to take advantage of, play must be initiated with numerical superiorities – specifically with the centrebacks and wingers.
• The centre-backs should look to drive forward with the ball to commit a defender, before either passing to a midfielder between the lines or towards either of the wingers in Zone A.
• The wingers and midfielders should position themselves in a manner to receive and overcome the first line of pressure – preferably one step beyond the defender and off their shoulder.
• Once the ball is successfully progressed into Zone A (inside to outside), the midfielders must immediately scan to identify spatial imbalances they could take advantage of in the opposition’s defensive line.
MOVEMENTS OF FORWARD & MIDFIELDERS
• The forward and midfielders must look to co-ordinate their movements to create spaces to exploit in the defensive line. If the forward positions on the second centre-back, the ball-side midfielder will have space to exploit behind the defensive line – as in Diagram 1.
• Midfielders should be alert to defenders leaving their positions and pressuring in Zone A, so timing their movements in behind as the defender begins to leave their position.
• The other midfielder should provide balance, to support the opposite winger after a switch in play or receive between the lines on a ball rotation.
COACHING DETAIL: OFFENSIVE TRANSITION
• Upon winning the ball, the defending team should secure possession and initiate their own possession game. The focus should be to connect 2-3 passes while the team repositions and balances space on the pitch.
COACHING DETAIL: MANAGING THE OPPOSITION
• The defending team should employ a zonal defence and maintain a high defensive line.
• After losing the ball, the team in possession should look to recover their defensive block immediately.
• When the possession team progresses the ball into Zone A, the defending team should apply immediate pressure on the ball-carrier.
See the guidance at the top of this page to understand why you are not seeing interactive Football/Soccer images.
6v6 +Gks +1 D2 (20 mins)
FUNCTION
• This small-sided game is a conditioned practice based on the pitch boundaries. The pitch is in an octagon shape to encourage unbalancing runs from midfielders. The sidelines are marked by the full lines, and the offside rule will be in effect.
• The team in possession – here, Team A – will set up in a 1-2-3-1 formation. The neutral player (C) positions in the midfield line of three to create a 1-2-4-1 shape.
• The defending team – here, Team B – sets up in a 1-2-3-1 formation, with the two centre-backs controlling the height of the defensive line.
• There are three ways to score: 1) Scoring a normal goal
is worth 1 goal; 2) Playing a pass from Zone A into a runner behind the defensive line in Zone B (as in Diagram 1), from where they score within 2 touches, is worth 2 goals; 3) A direct switch in play from Zone A to Zone A, followed by a cross into Zone B within 2 touches (as in Diagram 2) and then scoring with 1 touch is worth 3 goals.
• If the ball goes out of bounds, a new ball will begin with the opposition goalkeeper. The neutral player then switches teams to maintain the midfield overload.
• If the team in possession scores, a new ball begins back with their goalkeeper.
See the guidance at the top of this page to understand why you are not seeing interactive Football/Soccer images.
8v8 +Gks +1 conditioned (25 mins)
FUNCTION
• This 8+GK vs 8+GK +1 game is a conditioned practice based on the pitch boundaries. The pitch is in an octagon shape to encourage unbalancing runs from midfielders. The sidelines are marked by the full lines.
• The offside rule will be in effect, using the halfway line as a reference.
• The team in possession – here, Team A – will set up in a 1-3-1-3-1 formation. A neutral player (C) positions in the midfield line of three to create a 1-3-1–4-1 shape.
• The defending team – here, Team B – sets up in a 1-3-3-2 formation, with the three centre-backs controlling the height of the defensive line.
• There are three ways to score: 1) Scoring a normal goal is worth 1 goal; 2) Playing a pass from Zone A to a runner behind the defensive line in Zone B, from where they score within 2 touches, is worth 2 goals; 3) A direct switch in play from Zone A to the other Zone A, followed by a cross into Zone B within 2 touches, and scoring with 1 touch, is worth 3 goals.
• If the ball goes out of bounds, a new ball begins with the opposition goalkeeper. The neutral player then switches teams to maintain the midfield overload, with both teams shifting formation to reflect the change in status.
• If the possession team scores a goal, a new ball begins back with their goalkeeper.
COACHING DETAIL: IN POSSESSION
OFFENSIVE POSITIONING
• The team in possession should position in a 1-3-1-3-1 shape, with the wingers on both sides providing the width in Zone A.
• The midfielder should look to position between the lines, prioritising central positions and co-ordinating positions with the neutral player; one to the left and one to the right in what is now a 1-3-1-4-1 formation.
• The forward and centre-backs must provide the depth, prioritising central positions in Zone B. The forward should look to play on the back shoulder of the second centre-back.
2v1 IN BUILD-UP
• In order to work spatial advantages the midfielders can take advantage of, play must be initiated with numerical superiorities – specifically with the centre-backs and wingers.
• The centre-backs should look to drive forward with the ball to commit a defender, before either passing to a midfielder between the lines or towards either of the wingers in Zone A.
• The wingers and midfielders should position themselves in a manner to receive and overcome the first line of pressure – preferably one step beyond the defender and off their shoulder.
• Once the ball is successfully progressed into Zone A (inside to outside), the midfielders must immediately scan to identify spatial imbalances they could take advantage of in the opposition’s defensive line.
MOVEMENTS OF FORWARD & MIDFIELDERS
• The forward and midfielders must look to co-ordinate their movements to create spaces to exploit in the defensive line. If the forward positions on the second centre-back, the ball-side midfielder will have space to exploit behind the defensive line.
• Midfielders should be alert to defenders leaving their positions and pressuring in Zone A, so timing their movements in behind as the defender begins to leave their position.
• The other midfielder should provide balance, to support the opposite winger after a switch in play or receive between the lines on a ball rotation.
COACHING DETAIL: OFFENSIVE TRANSITION
• Upon winning the ball, the defending team should secure possession and initiate their own possession game. The focus should be to connect 2-3 passes while the team repositions and balances space on the pitch.
COACHING DETAIL: MANAGING THE OPPOSITION
• The defending team should employ a zonal defence and maintain a high defensive line.
• After losing the ball, the team in possession should look to recover their defensive block immediately.
• When the possession team progresses the ball into Zone A, the defending team should
'%3E%3Cpath id='path4169' d='M 11.4375,70.25 C 11.457031,38.394531 37.277344,13.242188 68.253906,13.050781 99.78125,12.855469 125.73047,38.351563 125.8125,70.078125 125.89844,101.62109 100.43359,127.14063 69.148438,127.42188 37.582031,127.70703 11.464844,102.23438 11.4375,70.25 m 6.425781,-0.08984 c 0.03516,28.421871 23.027344,50.69922 50.519532,50.82031 C 96.433594,121.10156 119.30469,98.367188 119.38281,70.359375 119.45313,42.878906 97.382813,19.714844 69.015625,19.496094 40.75,19.277344 17.964844,42.035156 17.863281,70.160156' style='clip-rule:nonzero;fill:%23333f48;fill-opacity:1;fill-rule:nonzero;stroke:none' /%3E%3Cpath style='fill:%23333f48;fill-opacity:1;fill-rule:nonzero;stroke:none' d='m 39.789063,108.62109 c 0.28125,0.14454 0.550781,0.32032 0.839843,0.4336 2.734375,1.05469 5.554688,1.78125 8.453125,2.23047 2.734375,0.42578 5.484375,0.64453 8.25,0.54297 3.988282,-0.15625 7.832032,-0.94922 11.445313,-2.69532 1.683594,-0.8164 3.246094,-1.82422 4.640625,-3.07422 3.265625,-2.92578 5.171875,-6.582027 5.796875,-10.906246 0.546875,-3.761719 0.04687,-7.425781 -1.09375,-11.019531 -1.4375,-4.523438 -3.730469,-8.582032 -6.703125,-12.265625 -1.03125,-1.277344 -2.082031,-2.535157 -3.113281,-3.808594 C 66.789063,66.1875 65.332031,64.269531 64.0625,62.21875 c -1.601562,-2.582031 -2.835937,-5.316406 -3.613281,-8.261719 -0.683594,-2.574218 -0.902344,-5.1875 -0.6875,-7.828125 0.214844,-2.617187 0.910156,-5.117187 2.152344,-7.441406 2.164062,-4.050781 5.503906,-6.710937 9.816406,-8.179687 1.890625,-0.640625 3.835937,-1.058594 5.832031,-1.195313 1.121094,-0.07813 2.242188,-0.152344 3.363281,-0.164062 4.28125,-0.02734 8.4375,0.734375 12.453125,2.175781 1.871094,0.671875 3.6875,1.496094 5.523438,2.257812 0.226562,0.09375 0.4375,0.230469 0.664062,0.351563 -0.164062,0.25 -0.371093,0.160156 -0.539062,0.164062 -2.824219,0.101563 -5.535156,0.703125 -8.132813,1.804688 -1.335937,0.570312 -2.570312,1.316406 -3.648437,2.296875 -2.527344,2.296875 -3.605469,5.15625 -3.34375,8.550781 0.140625,1.855469 0.722656,3.574219 1.550781,5.222656 0.648438,1.296875 1.414063,2.523438 2.292969,3.675782 0.953125,1.25 1.929687,2.484375 2.929687,3.699218 2.085938,2.523438 4.164063,5.054688 6.050782,7.738282 2.203125,3.136718 4.140627,6.417968 5.589847,9.980468 1.16406,2.867188 2.01562,5.820313 2.39843,8.894532 0.25,2.011718 0.30079,4.03125 0.11719,6.058593 -0.24219,2.640625 -0.79297,5.195313 -1.74609,7.667969 -1.29688,3.36328 -3.300784,6.22656 -5.972659,8.63281 -2.429687,2.19141 -5.171875,3.90625 -8.109375,5.3125 -2.695312,1.29297 -5.464843,2.40235 -8.34375,3.20313 -1.953125,0.54687 -3.945312,0.8789 -5.949218,1.15625 -3.035157,0.41797 -6.085938,0.48828 -9.132813,0.3125 -5.328125,-0.3125 -10.476562,-1.46094 -15.410156,-3.52344 -3.449219,-1.44141 -6.691406,-3.25781 -9.757813,-5.39453 -0.183593,-0.12891 -0.378906,-0.25 -0.53125,-0.41016 -0.07031,-0.0703 -0.05859,-0.22656 -0.08203,-0.34375 z m 0,0' id='path4175' /%3E%3Cpath style='fill:%23333f48;fill-opacity:1;fill-rule:nonzero;stroke:none' d='M 94.699219,29.390625 C 94.089844,29.21875 93.476563,29.054688 92.867188,28.875 90.183594,28.085938 87.46875,27.441406 84.703125,27.046875 c -3.976562,-0.566406 -7.945312,-0.59375 -11.863281,0.402344 -7.535156,1.914062 -12.386719,6.71875 -14.878906,13.996094 -0.894532,2.617187 -1.179688,5.328125 -0.953125,8.078125 0.203125,2.484375 0.867187,4.859375 1.816406,7.160156 0.933594,2.261719 2.117187,4.390625 3.4375,6.449219 1.4375,2.25 3.050781,4.371093 4.640625,6.511718 1.4375,1.933594 2.867187,3.871094 4.261719,5.835938 1.230468,1.730469 2.316406,3.546875 3.273437,5.445312 1.324219,2.625 2.265625,5.378907 2.703125,8.292969 0.433594,2.902344 0.292969,5.765625 -0.660156,8.5625 -0.9375,2.74609 -2.574219,5.00781 -4.777344,6.875 -2.417969,2.04688 -5.203125,3.39844 -8.246094,4.22266 -1.835937,0.5 -3.703125,0.75781 -5.609375,0.82031 -3.886718,0.13281 -7.679687,-0.47266 -11.421875,-1.46094 -2.261718,-0.59765 -4.488281,-1.33203 -6.695312,-2.11328 -0.207031,-0.0742 -0.40625,-0.16797 -0.597656,-0.25 -0.02344,-0.24609 0.148437,-0.19141 0.25,-0.20703 1.96875,-0.30469 3.921875,-0.67969 5.804687,-1.34766 1.367188,-0.48437 2.671875,-1.10156 3.855469,-1.94922 2.25,-1.61328 3.65625,-3.765621 4.0625,-6.515621 0.273437,-1.867188 0.09375,-3.710938 -0.429688,-5.527344 -0.472656,-1.648437 -1.171875,-3.199219 -2.109375,-4.628906 -0.792968,-1.207031 -1.636718,-2.382813 -2.523437,-3.519531 -0.921875,-1.195313 -1.921875,-2.328125 -2.890625,-3.484375 -2.753906,-3.273438 -5.351563,-6.660157 -7.523438,-10.355469 -2.042968,-3.480469 -3.667968,-7.136719 -4.597656,-11.078125 -0.640625,-2.699219 -0.980469,-5.4375 -0.832031,-8.214844 0.238281,-4.53125 1.476562,-8.78125 3.824219,-12.6875 1.082031,-1.800781 2.445312,-3.375 3.988281,-4.800781 2.742187,-2.527344 5.863281,-4.480469 9.257812,-5.992188 3.746094,-1.667968 7.652344,-2.769531 11.707032,-3.394531 3.152343,-0.488281 6.324218,-0.671875 9.507812,-0.519531 8.632813,0.410156 16.671875,2.792969 24,7.433594 0.08203,0.05078 0.152344,0.109375 0.230469,0.167968 -0.0039,0.04297 -0.0078,0.08984 -0.01563,0.136719' id='path4177' /%3E%3Cpath style='fill:%23333f48;fill-opacity:1;fill-rule:nonzero;stroke:none' d='m 31.699219,38.75 c -0.07813,0.238281 -0.152344,0.476563 -0.238281,0.710938 -1.460938,4.074218 -2.066407,8.28125 -1.808594,12.59375 0.4375,7.304687 2.808594,13.925781 7.277344,19.753906 3.714843,4.84375 7.441406,9.671875 11.167968,14.503906 1.113282,1.441406 1.953125,3.007813 2.414063,4.777344 0.332031,1.257812 0.425781,2.539062 0.273437,3.820312 -0.214843,1.832032 -1.070312,3.34375 -2.464843,4.546875 -0.984375,0.851559 -2.113282,1.449219 -3.316407,1.925779 -1.378906,0.54297 -2.8125,0.89063 -4.273437,1.1211 -2.226563,0.35547 -4.46875,0.46093 -6.722656,0.41015 -0.589844,-0.0156 -1.046875,-0.18359 -1.433594,-0.625 -0.636719,-0.72265 -1.335938,-1.39062 -1.9375,-2.14062 C 25.574219,93.800781 22.300781,86.621094 20.84375,78.636719 20.152344,74.835938 19.917969,71 20.15625,67.128906 20.796875,56.773438 24.390625,47.574219 30.859375,39.480469 c 0.21875,-0.273438 0.453125,-0.53125 0.679688,-0.796875 0.05469,0.02344 0.109375,0.04297 0.160156,0.06641' id='path4179' /%3E%3Cpath style='fill:%23333f48;fill-opacity:1;fill-rule:nonzero;stroke:none' d='m 105.41016,101.30078 c -0.13282,-0.3125 0.0234,-0.5039 0.0977,-0.69922 1.38672,-3.749997 1.98047,-7.628904 1.89844,-11.621091 -0.14453,-6.84375 -2.08594,-13.144531 -5.73437,-18.925781 C 99.890625,67.226563 97.917969,64.53125 95.835938,61.917969 94.4375,60.160156 92.988281,58.4375 91.582031,56.6875 90.632813,55.511719 89.6875,54.335938 88.792969,53.121094 c -0.835938,-1.144531 -1.488281,-2.398438 -1.953125,-3.742188 -0.523438,-1.515625 -0.695313,-3.070312 -0.511719,-4.652343 0.21875,-1.839844 1.082031,-3.339844 2.476563,-4.542969 1.039062,-0.890625 2.230468,-1.507813 3.503906,-1.980469 1.632812,-0.609375 3.320312,-0.960937 5.046875,-1.175781 1.917969,-0.238281 3.839841,-0.269531 5.769531,-0.230469 0.52734,0.01172 0.89453,0.203125 1.23828,0.585938 5.50391,6.113281 9.26172,13.144531 11.21875,21.132812 1.11719,4.554688 1.5625,9.179688 1.30469,13.855469 -0.58203,10.625 -4.23438,20.082031 -10.96094,28.339846 -0.15625,0.1914 -0.32812,0.375 -0.51562,0.58984' id='path4181' /%3E%3Cpath style='fill:%23333f48;fill-opacity:1;fill-rule:nonzero;stroke:none' d='m 39.796875,108.63281 c -0.05859,0.0117 -0.117187,0.0234 -0.175781,0.0352 0.05469,-0.0156 0.113281,-0.0312 0.167969,-0.0469 z m 0,0' id='path4183' /%3E%3C/g%3E%3C/svg%3E)

 Play animation
 Play step-by-step
 Repeat (toggle)
 Full Screen
 Pause
Pause Stop
Stop
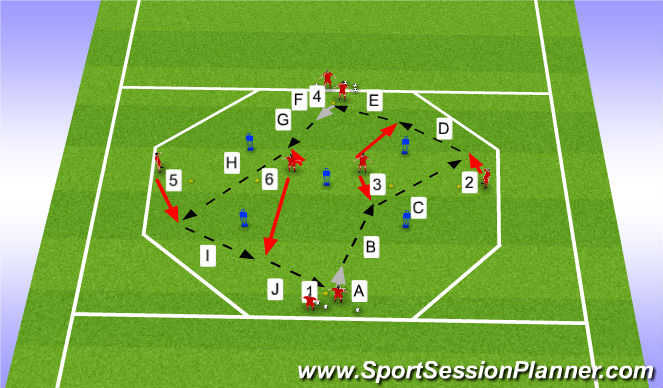
Warm-up technical Passing patterns Pt1 (10 mins)
FUNCTION 1
• Function 1 is an unopposed technical warm-up that focuses on midfielders receiving between the lines, playing outside to the winger, and then unbalancing diagonally behind the defender (here represented by mannequins) to receive in behind the defensive line.
• Two balls will be working, both beginning at the same time at Cone 1 and Cone 4.
• The sequence (1-5) illustrated above from Cone 1 should be replicated down the other side from Cone 4. After a block of work, the same pattern can be repeated going in the opposite direction.
• The players rotate according to the numerical sequence denoted by the cones.
COACHING DETAIL: TECHNICAL
WEIGHT & TEXTURE OF PASS
• Passes between the lines and out wide to the wingers should be crisp, on the ground and towards the receiver’s furthest foot to allow for a clean reception.
• In Function 2, the third-man pass (3) can be a clip in the air with one touch, to beat the forward mannequin, or a bent ball with pace around the mannequin towards the receiver’s furthest foot.
• When playing the pass in behind the defensive line towards the midfielder (4), the pass should be weighted in a manner that allows the midfielder to play to the next teammate with one touch.
BODY POSITIONING
• When receiving in between the lines, the midfielder should position themselves side-on to receive with the furthest foot and quickly execute the pass to the winger with the opposite foot. • They should also check their shoulders when moving towards the ball, in order to gain information from 360 degrees and know where teammates, opposition and space all are.
• The wingers receiving outside should be side-on, with shoulders squared forward to be able to receive cleanly with the furthest foot, for a two-touch execution, or to make the play with one touch using the furthest foot.
TIMING OF RUNS
• When checking to the ball to receive, the midfielders should initiate movements in the opposite direction to lose their marker before receiving.
• In Function 1, as the ball is travelling outside to the winger, the midfielder should subtly take one movement towards the winger before changing pace at a high tempo to receive behind the defensive line.
• In Function 2, after setting the ball back to the player at Cone 1, the midfielder will look to perform similar movements by deceptively moving towards the winger before changing pace at a high tempo to receive behind the defensive line