Football/Soccer Session (Moderate): 1-5-1-3-1
Profile Summary

| Name: | JJ Ruane |
|---|---|
| City: | Chicago |
| Country: | United States of America |
| Membership: | Adult Member |
| Sport: | Football/Soccer |
Description
Key points:
1) Pressure & Cover all over the field
2) Transition to defense must be instantaneous
3) Maintain shape and balance
4) Compactness defensively
5) Dynamic mobility in the attack - exchange positions
5) Defend Key areas
See the guidance at the top of this page to understand why you are not seeing interactive Football/Soccer images.

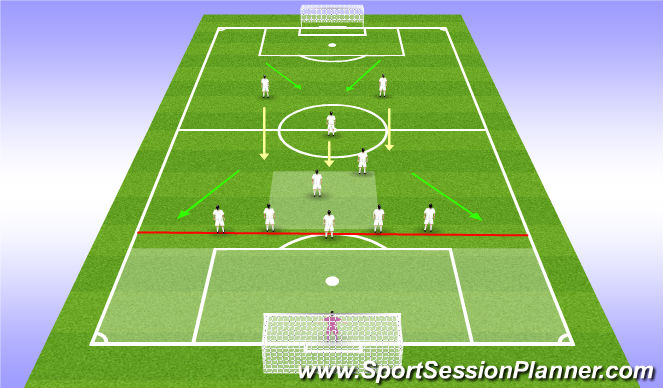
General Defensive shape
1) It is vital for the back line to defend the "seams" (spaces between defenders)
2) HMs need to defend most dangerous area (shaded), space between CBs and HMs. There should always be a player in this area!
3) We should double team the player with the ball in the above area, at the very least apply immediate pressure.
4) Shaded areas are HIGH PRESSURE areas (immediately attack the ball)
5) Red line is "line of confrontation" (the furthest distance we trade for time and begin to pressure)
6) Green arrows show where we generally should force their attack
7) Yellow arrows show how the three forward players should defend, add "back pressure" to the ball.
See the guidance at the top of this page to understand why you are not seeing interactive Football/Soccer images.

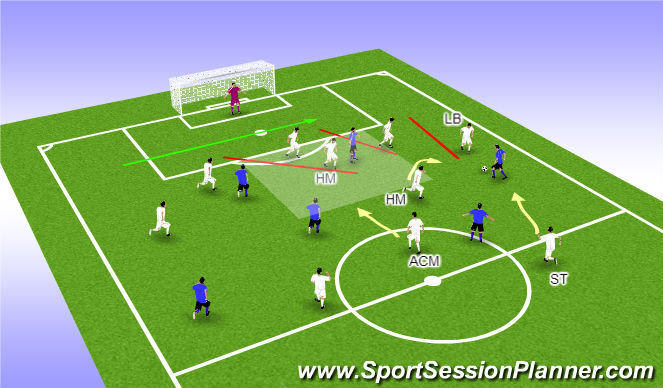
Example 1
Do your best to keep the ball out of the shaded area!!
1) Yellow arrows show back pressure from ST and balancing movement of ACM. HM is cutting off central pass
2) Red lines indicate the "seams" that we need to be protecting. DO NOT GET SPLIT!!
3) Green arrow shows direction that our back line needs to shift (ball side)
4) Other HM is man-marking their forward in the dangerous central area
See the guidance at the top of this page to understand why you are not seeing interactive Football/Soccer images.

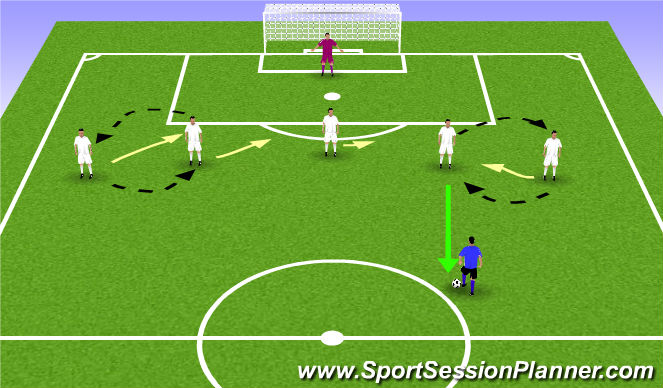
Back line movement
With 5 in the back line, we can afford to send any one of the players. Be careful sending your center back. No matter which player steps forward to pressure or join the attack, the other 4 should shift to fill in the now open space. This would leave us with a very familiar back FOUR. If the player is caught out of position, defend the goal until the player returns (delay the attack). The above graphic is to show movement of the back line. More often than not, we will have a HM to help pressure the ball (green and yellow arrows). The dotted lines are meant to show that these positions will exchange frequently during attacking and defending. The important thing here is to maintain shape! We should only be getting beat with long balls over the top, ranged shots, and crosses. Nothing through the middle!!
See the guidance at the top of this page to understand why you are not seeing interactive Football/Soccer images.

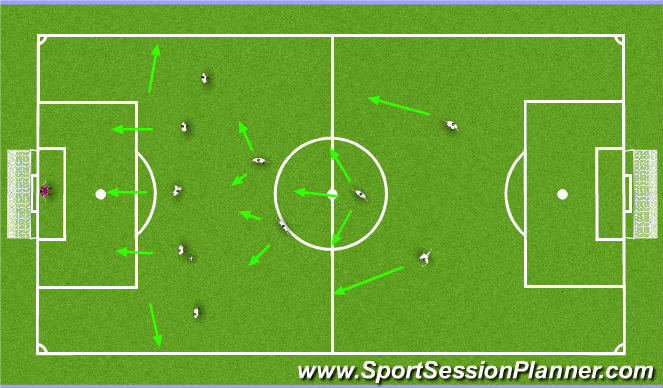
Maintaining possession
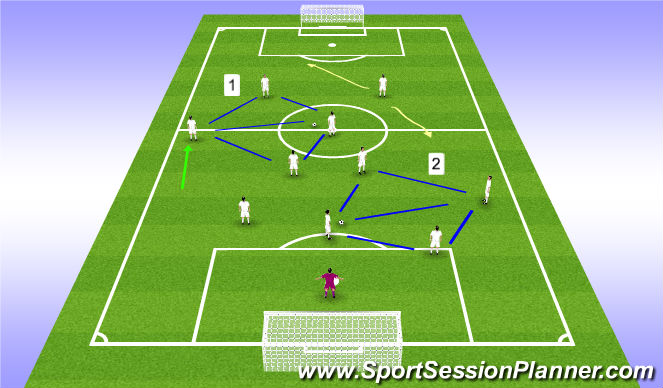
Arrows show general movement to maintain possession of the ball (when a defender or HM has the ball). Keep it simple!! If the CBs do not drop to create a playable space with low pressure, the player with the ball will have a hard time maintaining possession. Do not forget to use your GK (dependent on field conditions). Outside backs should also create as much width as possible to help alleviate pressure and maintain possession. Playing a penetrating forward ball into our mids or forwards will be the best way to break pressure.
See the guidance at the top of this page to understand why you are not seeing interactive Football/Soccer images.

Attacking out of back
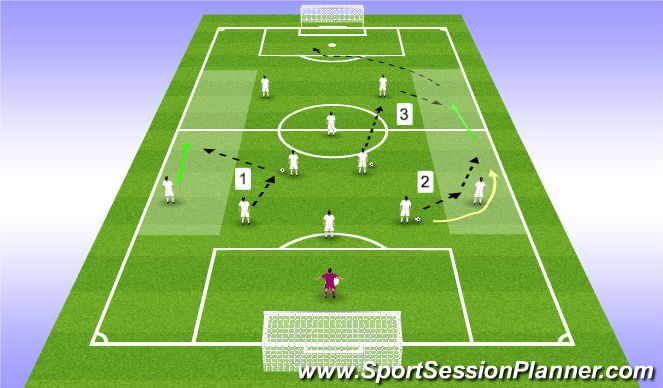
The big idea of this system is to maintain balance while attacking out of the back. Out of the back, look to get the ball into the wide areas (flanks). Example 1 shows a wall pass to send the LB forward. Example 2 shows an overlap to get the RCB into the flank (the RB would exchange position and hold the back line). Example 3 gives RB the ball from another combination finishing with a cross. In the flanks, the player needs to attack quickly and look to get the ball back inside once pressure increases (or beat an opponent 1v1). Crosses behind the defensive line are valuable here. Our formation in the attack should be an overloaded 4-3-3. Only ONE HM should get involved in attack. We can sharpen this attack further by attacking on one side of the field ONLY depending on the match ups of weaker opponents.
See the guidance at the top of this page to understand why you are not seeing interactive Football/Soccer images.

Diamond tactic
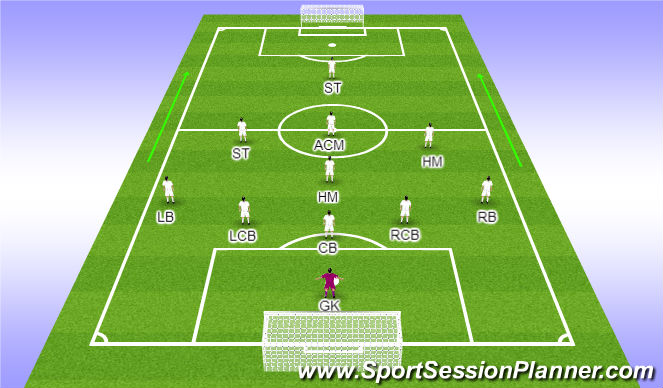
The diamond tactic gives the player with the ball 3 simple, short options in his/her field of vision. Move yourself into a position that gives your teammate as many simple options as possible (clear passing lane away from pressure). Those players outside of the immediate traingle should look to make penetrating or layered runs (yellow arrows). As always: attack seams, attack on angles (no straight runs or passes), attack with speed, take chances in final third, and be brave in the air.


 Play animation
 Play step-by-step
 Repeat (toggle)
 Full Screen
 Pause
Pause Stop
Stop
Starting Positions
These are the starting positions.
ST=striker
ACM=attacking center mid
HM=holding mid
LB=left back
LCB=left center back
CB=center back
RCB=right center back
RB=right back
GK=goal keeper